Here, I will walk through step by step process for creating an Event Handler using Visual Studio.
There are lots of Event Sources like Document Library, List, Surveys, Tasks, Workflows etc. provided by Sharepoint . Similarly multiple Events available for each event source like Upon Uploading, modification, Check in, Check Out etc.
Based on your Required use the required Event Source and Event.
In this demo, I used Visual Studio 2013 and created an Event Handler on Document Library to update Title property when a Document is Uploaded.
Step 1: Create ‘Documents’ Document Library in any Site.
Step 2: Open Visual Studio and Create a New ‘Sharepoint 2013 Empty Project’

Step 3: Then a wizard is Popped up to select the Site for Debugging and Trust Level of Solution. Provide the Site / Site Collection where the ‘Documents’ Library created in Step 1 and Select ‘Deploy as a Farm Solution’

Step 4: Now, click on Add New Item to the Project and select ‘Event Receiver’, provide the Name for Event receiver.
 Note: Make sure this Event Receiver Name is Unique across other Event Receivers deployed in the Site Collection.
Step 5: Then a Wizard is popped up to select the Event Receivers and Events for which we need to handle.
 Here I have chosen Library and also Selected Item Added and Updated Events.
Now the solution will have a Feature and Event Receiver and the Solution Explorer will appear as in below image

Step 6: In Step 5, where we selected event source, we actually selected a template i.e. in this example when we selected Document Library, it applies for all document libraries in the site collection where we enabled this feature.
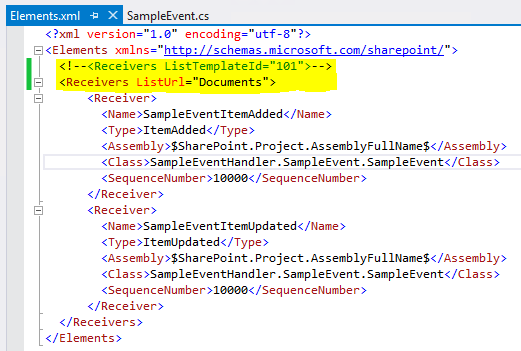
But, I do need for one Specific Library only. To do this, we need to customize the Elelments.xml of the Event receiver. The Code in Event Receiver Appear as in below image.
 The highlighted part in above image depicts that we are applying this event for List Template”101” which is document library.
So, comment it and provide the List Url for which we want to apply. It appears as in below image.

Step 7: Open the ‘SampleEvent.cs’ and we will have 2 methods already added, one for ItemAdded and other for ItemUpdated. Similarly, for every Event type we check, corresponding methods are created.
 Write your custom code in the Methods. In above sample I updated Document title.
Step 8: Now Deploy the Solution and Activate the Feature in the Site Collection where Documents library created. With these steps, the Event handler is created and attached to the Documents Library. To test it, Add a document and upon upload, Edit properties page is opened with Title Auto filled.
Happy Coding! :-)
There are lots of Event Sources like Document Library, List, Surveys, Tasks, Workflows etc. provided by Sharepoint . Similarly multiple Events available for each event source like Upon Uploading, modification, Check in, Check Out etc.
Based on your Required use the required Event Source and Event.
In this demo, I used Visual Studio 2013 and created an Event Handler on Document Library to update Title property when a Document is Uploaded.
Step 1: Create ‘Documents’ Document Library in any Site.
Step 2: Open Visual Studio and Create a New ‘Sharepoint 2013 Empty Project’

Step 3: Then a wizard is Popped up to select the Site for Debugging and Trust Level of Solution. Provide the Site / Site Collection where the ‘Documents’ Library created in Step 1 and Select ‘Deploy as a Farm Solution’

Step 4: Now, click on Add New Item to the Project and select ‘Event Receiver’, provide the Name for Event receiver.

Step 5: Then a Wizard is popped up to select the Event Receivers and Events for which we need to handle.

Now the solution will have a Feature and Event Receiver and the Solution Explorer will appear as in below image

Step 6: In Step 5, where we selected event source, we actually selected a template i.e. in this example when we selected Document Library, it applies for all document libraries in the site collection where we enabled this feature.
But, I do need for one Specific Library only. To do this, we need to customize the Elelments.xml of the Event receiver. The Code in Event Receiver Appear as in below image.

So, comment it and provide the List Url for which we want to apply. It appears as in below image.
Step 7: Open the ‘SampleEvent.cs’ and we will have 2 methods already added, one for ItemAdded and other for ItemUpdated. Similarly, for every Event type we check, corresponding methods are created.

Step 8: Now Deploy the Solution and Activate the Feature in the Site Collection where Documents library created. With these steps, the Event handler is created and attached to the Documents Library. To test it, Add a document and upon upload, Edit properties page is opened with Title Auto filled.
Happy Coding! :-)
No comments:
Post a Comment