Friday, November 25, 2016

Sharepoint 2013 Change Sharepoint Branding text in Top Left

In Sharepoint instance, we see a branding text 'SharePoint' on top left corner of the page.

There are multiple ways to change this text to our organization branding. Few of the easy approaches are as below.

Approach 1: Using Powershell.
In Powershell, we have a property SuiteBarBrandingElementHtml for webapplication using which we can read and set the Branding Element HTML. Use below code to read and set the text.
 #Add powershell snapin  
 Add-PSSnapin microsoft.sharepoint.powershell  
 #Get web application  
 $webApp = Get-SPWebApplication http://metisqa.broadridge.net/  
 write-host "Original Branding Text"  
 #read brand elemnt html  
 write-host $webApp.SuiteBarBrandingElementHtml  
 #Set Branding Element HTML. can include styles / class file as below   
 $webApp.SuiteBarBrandingElementHtml = "<div class='ms-core-brandingText'>Your Company Name</div>"  
 #Update the webapplication to reflect above changes  
 $webApp.Update()  
 write-host "Updated Branding Text"  
 #read existing brand elemnt html  
 write-host $webApp.SuiteBarBrandingElementHtml  

We can also set Images / hyper links in the branding text by simply setting the required HTML tagged text.

Approach 2: Using CSS
As the Branding text tag holds as CSS Class 'ms-core-brandingText', we can update styles around this class and change display  using 'Content' style attribute.
 .ms-core-brandingText:after  
 {   
      content:"Your company Name";  
      padding-left:10px;  
 }  
 .ms-core-brandingText{  
      margin-left: -95px;  
 }  

In this approach we can set images using css property background-image, but can't set any links to the branding element.

Approach 3: JavaScript / JQuery
Update html text in the html branding text tag. this can be achieved easily using the CSS class 'ms-core-brandingText'
 //Jquery code to set branding text  
 $('.ms-core-brandingText').html('Company Name');  
Here, we can also set image / hyper links by setting required html content in above code.

By using any of the above approached, it appears as below.


Wednesday, November 23, 2016

Project Professional 2013 Add-in using Visual Studio

In this article, I will walk through creation of a simple Add-in for Project Pro 2013 using Visual Studio 2013 and C# to add a new task when project load and also on a custom button click in Ribbon.

Step 1: Open Visual Studio 2013 and Create New Project, Select ‘Project 2013 Add-in’ from Installed -> Templates -> Visual C# -> Office/Sharepoint ->Office Add-ins

Step 2: Provide a Name for the project and click on Ok.

Project 2013 Add-in solution is created and it comes up with ‘ThisAddIn.cs’ class file and also the class has 2 default event handlers one is to trigger on Add-in Startup and other is on shut down.
 
Step 3: As one of our requirement here is to create a new task when Project loaded, let us create a method to add new task with defaults and attach this method to Project Load event handler in Startup method.
 

And the code is as below.
 //Method  
 void AddTask(MSProject.Project pj)  
 {  
    MSProject.Task newTask = pj.Tasks.Add  
       ("This text was added by using code on addin startup", missing);  
    newTask.Start = DateTime.Now;  
    newTask.Duration = "3";  
 }  
   
 //To add the above method to event handler  
 this.Application.NewProject += new   Microsoft.Office.Interop.MSProject._EProjectApp2_NewProjectEventHandler(AddTask);  

Step 4: As the other requirement is to create a task on button click in ribbon, let us add ribbon tab to this project. To do this, click on add new Item to the solution in Solution Explorer and under Installed -> Visual C# Items -> office/Sharepoint Select ‘Ribbon (Visual Designer)’. With Visual designer option, we will be able to drag controls from toolbox.

Step 5: with this, CustomRibbon class file and corresponding designer file are added to solution and it appears as below
 
Here we can rename label of ribbon and also the group name using properties window of corresponding control.

Step 6: Using toolbox, from Office ribbon controls section select button. There are lots of other controls and also we can add more tabs by right clicking on design screen in tab area.

Step 7: Add Image to button and also label the button from property screen and finally it appears as below 

Step 8: By double clicking on the button, it redirects to class file with button click event handler created and attached to the corresponding button. This can also be done through properties window.
In the event handler method, let us write the required code to add a new task to the current plan loaded 

And the code is as below,
 MSProject.Project currProject = Globals.ThisAddIn.Application.ActiveProject;   
 MSProject.Task newTask = currProject.Tasks.Add  
    ("This text was added by using code on button click",Type.Missing);  
 newTask.Start = DateTime.Now;  
 newTask.Duration = "3";  
With these steps, we completed the implementation and to test it, click on ‘Start Debugging’ and it opens up the Project Pro. Select the environment and click on a “New project” or select an existing project.


Note: Once we run the solution, it creates a set of registry entries and also some security settings are configured to enable this add in.
So, once tested, remove the above created entries and changes by cleaning the solution.

Monday, September 5, 2016

Learning Google Maps Javascript API


If you have any requirement related to Maps in your website, one among the famous APIs is Google Maps Javascript API. There are many cool features available in it and also it’s very easy to get the knowledge on it.

In this post, I will walk through some basic features of it and also will explain how to add it to a web page.

To display a simple map in a website using this API, follow below procedure.

As we need an html placeholder to display the map, add a Div in the html, where we need to show this map and provide an ID to it to refer it through Javascript DOM.

Load the Maps API into the website. We have multiple options / attributes here, explained as below
<script async defer
      src=https://maps.googleapis.com/maps/api/js?key=YOUR_API_KEY&callback=initMap />


The ‘async’ attribute in above allows the API to load along with Page.
Once the API is loaded, it calls the Callback method provided in URL, in above example it is initMap.

If we want to call the method through Javascript after the page loaded, use below line. 
google.maps.event.addDomListener(window, 'load', initMap);

Also, once we register to Google maps, we are provided an API key, we have to provide it in the URL parameter. If it’s just for demo purpose / development, we can ignore the Key for now.

We have multiple Classes in this API. Few important ones are explained as below

Maps: This class holds the Maps on the screen. We can create multiple objects  of it and each one holds a map instance on the page.The Constructor has 2 parameters, one is the DOM element of the placeholder in the web page where the Map is  displayed and the other one is Maps Options list. Few options are as below,
Zoom: Number ranging from 1 to 20. 1 being zoomed at maximum level, World and 20 being zoomed at minimum level, Buildings.
Center: A latlng object referring to a position the map to be centered at

LatLng: This class represents a Point on a map, having a latitude and longitude. Constructor has 2 parameters, Latitude and Longitude values.

Marker: This class represents a marker / pointer displayed on the Map. We can add any number of Markers to a Map. This constructor takes in Options list. There are many options and below are few.
Positon: a latlng object referring to a position on the map where the pointer to be set
Map: Map object, the object of the map on which we are adding the markers
Title: title of the Marker, it is displayed upon hovering the pointer
Label: A label is the value appeared on the Pointer like , characters ‘A’,’B’ or ‘1’, ‘2’

Below is the sample code containing all these steps . Copy to your local html file and run it in a browser.
<!DOCTYPE html>
<html>
  <head>
    <title>Google Maps Demo</title>
    <meta name="viewport" content="initial-scale=1.0">
    <meta charset="utf-8">
    <style>
      html, body {
        height: 100%;
        margin: 0;
        padding: 0;
      }
      #mapSection {
        height: 100%;
      }
    </style>
  </head>
  <body>
    <div id="mapSection"></div>
    <script src="https://maps.googleapis.com/maps/api/js?v=3.exp"></script>
    <script>
      var userMap;
      function initMap() {
        var hyderabad = new google.maps.LatLng(17.4126,78.2679);
        var mapOptions = {  
           zoom:7,  
           center: hyderabad  
        }; 
        userMap = new google.maps.Map(document.getElementById('mapSection'), mapOptions);

        var location1 = new google.maps.LatLng(17.4510051,78.3748113);
     var marker1 = new google.maps.Marker({
        position: location1,
        map: userMap,
        title: 'Shilparamam',
        label:'A'
     });
     var location2 = new google.maps.LatLng(17.3615687,78.4724758);
     var marker2 = new google.maps.Marker({
        position: location2,
        map: userMap,
        title: 'Charminar',
        label:'B'
     });    
      }
      google.maps.event.addDomListener(window, 'load', initMap); 
    </script>
  </body>
</html>


It will be appearing in web page as below.
 

Thursday, April 28, 2016

Windows Service using C# in Visual Studio 2013

Here, I will walk through step by step process for creating and deploying Windows Service using Visual Studio 2013 in C#.

Before we go in details, just to understand on a high level, a Windows Service is a computer program that runs in the background with out End User interference. It can be started automatically when the system boots.


Mainly we use Windows Service to run Scheduled Jobs, like sending Daily Report emails to Managers , Newsletters to the team.

In this demo, I created Windows Service in C# using Visual studio 2013 and scheduled it for every minute.

Step 1: Open Visual Studio and Create a New ‘Windows Service’ Project available in Visual C#, Windows Category.

Step 2:  In the Project solution, we will be able to see multiple files, one of them is Service1.cs. Rename it as per the functionality we are going to implement.

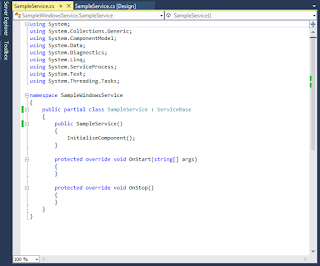
Step 3: Go to Code View screen by clicking on 'click here to switch to code view'.

Here we would see 3 methods auto populated. The first one is on Initiation of the service.
OnStart method is executed when we start the Service, this could be automated or manual event.
OnStop method is executed when the service is stopped, could be manual by end user or when syste m shuts down or some automated process.
Step 4: Here we have to add the timer to schedule the functionality or job which we want to execute at regular interval. Below is the sample code
using System;
using System.IO;
using System.ServiceProcess;

namespace TimesheetTaskCreation
{
    public partial class TaskCreation : ServiceBase
    {
        public TaskCreation()
        {
            InitializeComponent();
        }

        protected override void OnStart(string[] args)
        {
            WriteLog("Service Started.");

            // Set up a timer to trigger every minute.
            System.Timers.Timer timer = new System.Timers.Timer();
            timer.Interval = 60000 * 1; //1 min
            timer.Elapsed += new System.Timers.ElapsedEventHandler(this.OnTimer);
            timer.Start();

        }

        public void OnTimer(object sender, System.Timers.ElapsedEventArgs args)
        {
            // TODO: Insert monitoring activities here.
            WriteLog("Performing Service Action.");

            //Perform the actions here
        }

        protected override void OnStop()
        {
            WriteLog("Service Stopped.");
        }

        private void WriteLog(string text)
        {
            StreamWriter sw = null;
            try
            {
                sw = new StreamWriter(AppDomain.CurrentDomain.BaseDirectory + "LogFile.txt", true);
                sw.WriteLine(DateTime.Now.ToString() + ":" + text);
                sw.Flush();
                sw.Close();
            }
            catch (Exception e)
            {

            }
        }
    }
}


"WriteLog" is a function used to update Log file maintained in the installation folder location.
"OnTimer" is the event handler fired upon reaching configured duration
And, the timer is setup in OnStart method, so when the service is started, Timer will be started and the job is scheduled.

Step 5: Now, we need to add an installer to the service. To do this, right click on the Service.cs file and click on 'Add Installer'
A new file Projectinstaller.cs is added and it has 2 controls, 'SerivceInstaller' and 'ServiceProcessInstaller'
Step 6: Go to Properties of ServiceInstaller and provide Service name and description. Also, Change start type to Manual.

Step 7: Now, go to properties of SercieProcessInstaller and set Account to LocalService. The service will be running on this account. Based on your job's access requirements, use the Account.

Step 8: With these steps, the Windows service is ready and we need to Deploy / Install it. To do this, Build the solution and in the Bin folder, we will have an EXE file as in below image

Step 9: Now, open Visual Studio Command Prompt and go to the file location where we have the exe file as in above step. And to install, the command we use is 'InstallUtil.exe <exe file>'


Step 10: After we execute above command, we get successfully installed message on command prompt and then open the System services to view installed service. To open, run 'Services.msc' in System Run .
Upon clicking on Start, the service will be started the job is scheduled. We can see the logs in the Log file created in same folder.
To uninstall the Service, the command we use is 'InstallUtil.exe /u <exe file>'. To execute this command, go to the same folder where we have the exe file.

Happy Coding! :-)

Friday, April 15, 2016

Custom Event Handler in Sharepoint 2013 using Visual Studio

Here, I will walk through step by step process for creating an Event Handler using Visual Studio.

There are lots of Event Sources like Document Library, List, Surveys, Tasks, Workflows etc. provided by Sharepoint . Similarly multiple Events available for each event source like Upon Uploading, modification, Check in, Check Out etc.

Based on your Required use the required Event Source and Event.

In this demo, I used Visual Studio 2013 and created an Event Handler on Document Library to update Title property when a Document is Uploaded.

Step 1: Create ‘Documents’ Document Library in any Site.
Step 2: Open Visual Studio and Create a New ‘Sharepoint 2013 Empty Project

Step 3: Then a wizard is Popped up to select the Site for Debugging and Trust Level of Solution. Provide the Site / Site Collection where the ‘Documents’ Library created in Step 1 and Select ‘Deploy as a Farm Solution

Step 4: Now, click on Add New Item to the Project and select ‘Event Receiver’, provide the Name for Event receiver.
Note: Make sure this Event Receiver Name is Unique across other Event Receivers deployed in the Site Collection.

Step 5: Then a Wizard is popped up to select the Event Receivers and Events for which we need to handle.
Here I have chosen Library and also Selected Item Added and Updated Events.

Now the solution will have a Feature and Event Receiver and the Solution Explorer will appear as in below image

Step 6: In Step 5, where we selected event source, we actually selected a template i.e. in this example when we selected Document Library, it applies for all document libraries in the site collection where we enabled this feature.

But, I do need for one Specific Library only. To do this, we need to customize the Elelments.xml of the Event receiver. The Code in Event Receiver Appear as in below image.
The highlighted part in above image depicts that we are applying this event for List Template”101” which is document library.

So, comment it and provide the List Url for which we want to apply. It appears as in below image.

Step 7: Open the ‘SampleEvent.cs’ and we will have 2 methods already added, one for ItemAdded and other for ItemUpdated. Similarly, for every Event type we check, corresponding methods are created.
Write your custom code in the Methods. In above sample I updated Document title.

Step 8: Now Deploy the Solution and Activate the Feature in the Site Collection where Documents library created. With these steps, the Event handler is created and attached to the Documents Library. To test it, Add a document and upon upload, Edit properties page is opened with Title Auto filled.

Happy Coding! :-)

Thursday, March 31, 2016

SQl Server: Group Adjacent Rows if Certain Column Value is Same.

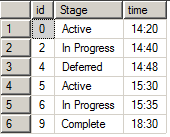
Below image to the left is original data as in Status change Tracker table. And, what we are expecting is the one to the right. i.e. we want to group the adjacent rows if they are in same stage and need the time stamp when the Stage added for the first time.


To achieve this, below is the simple query needed.
select t.*
from #StatusLog t
left join #StatusLog t1 on t.id = t1.id + 1 and t1.Stage = t.Stage 
where t1.id is null

If we don't have a Column as ID with sequential numbers, use Row_Number () to get the sequential number for rows and execute above script by replacing Id column with it.

Also, if multiple columns should be equal, we can add them along with stage condition in above script.

Sunday, March 27, 2016

Access Sharepoint Lists in SSRS Reports (SQL Server 2012)

There are many cases where we need to display SharePoint List records in SSRS reports. To achieve this, earlier we used to follow different hard paths like trying to access SharePoint Database, using some 3rd party tools to integrate SharePoint lists, etc.


But, in SQL Server 2012 reporting / Report Builder 3.0, this was made straight forward be adding an option 'Microsoft SharePoint List' in Data source type selection. follow below simple steps to get some basic idea on creating a Dataset for a SharePoint List.


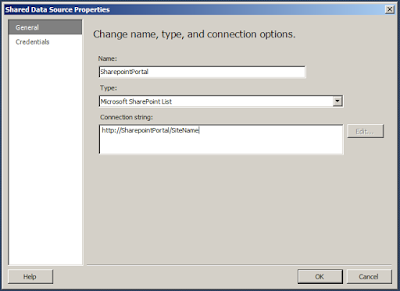
1. Click on Create New Data Source and select 'Microsoft SharePoint List' from Type Selection Dropdown

2. Now, prove the SharePoint Portal URL in Connection String. Also, provide the Credentials as per your need and Click on Ok.


3. Now we have a dataset pointing to the SharePoint Portal. We are left with creating a Dataset. Click on Create Dataset and select SharePoint Portal as Data source.
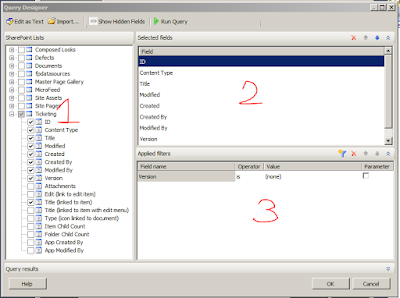
4. Now, click on Query Designer and you will be able to see the SharePoint Lists / Libraries available in provided SharePoint portal.
5. Select the List you needed and also the required fields from it. In section 3 in above image, you can filter the SharePoint List data. Once set up, click on OK.


Now we have a dataset which fetches data from SharePoint list and you can build any type of report using this data set.


Below are few important notes to be considered in this aspect.
  • Default view data is fetched  from the SharePoint list when we connect it as a Data Source
  • If we need to join multiple lists, easy way is to create a list in SharePoint using Lookup relations and then directly creating a dataset for the new list.