Showing posts with label Salesforce. Show all posts

Friday, May 19, 2017

Instantiation of a Page Reference in Apex, Salesforce

In many cases, after a custom action performed, we may need to redirect the page to a different page, could be another Visualforce page / standard Page like a list view of an object or any of default pages like view / edit page of a record or a new record entry page.

Page redirection happens in Apex code using PageReference class.

There are multiple ways to instantiate a page reference in Apex. Below are list of all possible ways.

Approach 1:
PageReference pageRef = new PageReference('***partialURL***');
PageReference pageRef = new PageReference('***FullURL***');

Eg:

PageReference pageRef = new PageReference('/apex/CustomPage1?id=xxxxxx');
PageReference pageRef = new PageReference('/a04');

PageReference pageRef = new PageReference('http://www.google.com');

Approach 2:
PageReference pageRef = Page.<<VF Page Name>>;

Eg:

PageReference pageRef = Page.CustomPage;
pageRef.getParameters().put('id','XXXXXXX');

Approach 3:
Refer stnadard pages of an Object / record

PageReference pageRef = new ApexPages.StandardController(recordObj).edit();
PageReference pageRef = new ApexPages.StandardController(recordObj).view();

Refer List view of an object

PageReference pageRef = new PageReference('/'+<<Object>>.sObjectType.getDescribe().getKeyPrefix());

PS: Try not to hard code URLs and use above available options to build the URLs.

Friday, April 21, 2017

Display Validation rule Errors on a Visualforce Page

One among the most useful features in Salesforce is Validation rules in an object. With Validation rules, e can provide a formula / conditional check and if it met, we display an error message to end user and thus stopping user from saving the record.  The advantage of validation rules is that it validates records when entered in forms and also through other means like data loader. So, if there are any conditions which are mandatory, better to have them in Validation rules, even though you have custom forms.

A simple example in my application is, we can't allow users to provide weight less than 1 LBS. To accomplish this, we added a validation rule as below.

And, in our application, we are having Visualforce pages for the forms as we have some complex functionalities which can't be accomplished through default layouts.

In order to display errors on forms like mandatory field / invalid value , we simply need to provide a visualforce component / tag "<apex:pagemessages />" in the layout as per our design. By adding this, upon save of an object, if there are any errors in data, they are listed in pagemessages section.

But, Validation rules, don't come under default errors of a data record. They actually through DML Exceptions. So, in order to show the validation errors, in the Apex class save method, we need to catch the  DML exceptions and just provide the exception to Apexpage messages. It parses the error messages and displays them in page messages. Below is sample code.

public class customController
{
    public object__C obj {get;set;}
    
    public customController(ApexPages.StandardController ctlr)
    {
        //Consturctor, define obj here.
    }
    
    public pagereference custommSave()
    {
        try
        {
            upsert obj;
            return new pagereference('/'+obj.id);
        }         
        catch(DmlException ex){
            ApexPages.addMessages(ex);
            return null;
        }
        catch(Exception ex){
            //Handle exception
            return null;
        }
    }
}

Happy coding!

Tuesday, January 24, 2017

Picklists are more flexible now, in Salesforce

It was a difficult task for developers / admins to change a value in a Picklist in salesforce, as the values are directly stored in the records and if any formula fields are derived on picklist values, has to be changed. Similarly in the APEX / Visualforce code, if there is any logic based on picklist values, has to be changed.

Salesforce eased this burden in Spring 17 release.  Now on wards we have 2 values for a Picklist value, one is a label and other one is API name.
Basically the values stored in the back end in a record are API Names. When we try to get the value of a field, it fetches API value. From above picture, if we try to pull value for obj.Urgency__c, the result will be Urgent.

So, all our formulae fields' logic and also in the apex code, we can go with API names. And, we can change the label value at any point of time as per customer's need.

In order to display Picklist value in a visualforce page, make sure we go with OutputField only, to get picklist value label.  If we directly go by object field, it would display API name.

<apex:outputField value="{!obj.Urgency__c}"/>

 Few Points to consider for Picklist API Names:
  • For the first time when we create Picklist values, provided values will go into label and API Name
  • At any point, we are allowed to change API names too, by editing individual value.
  • We can also restrict API name updates through a setting. This blocks users from updating API names of all Picklist values in the Org.
  • To enable / disable above setting, go to Settings->Administer->Data Management->Picklist settings.
Reference, https://developer.salesforce.com/blogs/developer-relations/2017/01/keeping-picklist-integrations-safe-using-api-names.html

Tuesday, June 30, 2015

Salesforce Custom Labels

In Visualforce Pages / custom Components, we might need to display static content. Also, in many places we will be displaying custom messages on screen, could be alerts / notes / error messages. In all these cases we can directly write the content in corresponding place holders. But the disadvantage of it is, to update the text we need to open the corresponding Visualforce or controller pages and edit them. Also, it doesn't support in multilingual applications i.e. doesn't have translations and if a person from different location logs in, this text language will not be changed.

To overcome these problems, and also maintain all messages at one place, Salesforce has provided 'Custom Labels'.

You can define a custom label for any message and can directly access it through apex code in controller or Visualforce page. We can also translate this to the languages supported by Salesforce.

To access custom labels, Go To Setup —> Create —> Custom Labels. All existing custom labels are displayed. Click on New Custom Labels.

A form will be opened. Provide all the required information and save it.

 Now you can see the newly created custom label. Also, in the bottom of screen, Translations section is available. Here we can provide the label's translation of all other languages this salesforce application / organization supports
 Click on 'New' button available in Translations section. Another form is opened, provide the translation and also select the language.


Now the label is available for usage and also it supports multi languages. 
You can access it throughapex and also visualforce page.

To access through Visualforce page, use global variable '$Label'
              In above example, it would be '{!$Label.Test_Item}'

To access through apex in controller, use 'System.Label'
              In above example, it would be 'System.Label.Test_Item'

Based on logged in user's language , the label text is displayed in corresponding translation.


Thursday, March 19, 2015

Configure Redirect URLs after Record Saved in Salesforce

In general, after a record is saved in Salesforce, it will redirect to Detail Screen or list of records of its corresponding Object.

There are many cases where we want to override this functionality. For example, after a new Account created, we want user to create Tasks to it, so once the New Account is saved, page should redirect to New Task screen with Current Account ID details.

To accomplish this, we in general need to create a Custom New Form for Account and in that form, we override default save action and once default save action is accomplished, we redirect using PageReference

We also save one more easy way to accomplish this on default forms, adding details through URL parameters.

By default, Salesforce provided 3 URL parameters,  'retURL', 'saveURL', 'cancelURL'.

We can make use of these parameters to redirect the screen after default button actions.

lets understand with below simple example.

https://demo.salesforce.com/a08/e?retURL=%2Fa08%2Fo&saveURL=/apex/google&cancelURL=/apex/yahoo

The above URL is actually a new form for a custom object.

https://demo.salesforce.com/a08/e

But we also provided other parameters along with URL.

saveURL=/apex/google, this parameter is used for redirection after the record saved. So, once a record is saved, it redirected to a custom page 'google', also the newly created record Id is sent as a parameter by default.

https://demo.salesforce.com/apex/google?newid=a08o0000006rTSR

cancelURL=/apex/yahoo, this parameter is used for redirection if user clicked on default Cancel button . This redirects to a custom page 'yahoo' if user cancelled the form.

Tuesday, March 17, 2015

Mathematical Operations & Number formatting in Visualforce Page

In a Visualforce page, if we want to do some basic mathematical Operations and display on the screen, eg: display percentage along with the existing value in a Table, we can use apex:outputtext

Sample code to implement it is as below, here we are displaying it in a PageBlockTable, display marks for each subject in one column and  Percentage (Calculated) for each subject in another column

 <apex:pageBlockTable value="{!score}" var="item">  
      <apex:column value="{!item.subject}"/>   
      <apex:column value="{!item.marks}" dir="RTL">  
           <apex:facet name="footer" >  
                {!total}  
           </apex:facet>  
      </apex:column>       
      <apex:column >  
           <apex:outputText value="{!(item.marks / total) * 100}%" />  
      </apex:column>  
 </apex:pageBlockTable>   

In above example, we already have a variable 'total' with sum of marks of all subjects.

In some scenarios, we  might need to format the text when we display on screen like, Currency notation / Date in a specific format etc.. apex:outputtext also has this functionality.

Sample code to implement it is as below, here we send input to outputtext as params, which are used with number notations {0} as in C, C++

 <apex:outputText value="{0, number, 000,000.00}$">  
   <apex:param value="{!AnnualRevenue}" />  
 </apex:outputText>  
  <apex:outputText value="The formatted time right now is:   
       {0,date,yyyy.MM.dd G 'at' HH:mm:ss z}">  
   <apex:param value="{!NOW()}" />  
 </apex:outputText>  


Monday, February 23, 2015

Display Images based on field value in Salesforce

It's very common requirement to display images for a specific field value in a record, as pictorial representation will be more conveying than text.

For example, to display Status of a record pictorially, lets have some rule as
  • If status Open - display Green image
  • If status Planning - display Amber image
  • If status Closed - display Red image

To implement this requirement in Salesforce, we have to store images in Salesforce , either in Documents or Static Resources and then, using Formula Field in the object, by comparing data of the actual field, we will set Image  relative path of the stored images

Lets do step by step as shown as below

Step 1 : Create images with the 3 colors as required and zip them.


Step 2: Add this zip file to the static resources and set the access of it as public
To do this , follow below steps
  1.  Login to salesforce environment and Go to Setup
  2. Under Build, select 'Develop' and then 'Static Resources
  3. Click on New and fill in the required information by uploading the Zipped file
  4. select Cache Control 'Public' and save


Step 3: Open the Object in which we need to set the images and create a Choice field to select Status and then a new Formula field to set image according to the data of the created Choice Field
To do this, follow below steps
  1. Go to Setup
  2. Under Build, Select 'Create' and then 'Objects'
  3. List of all objects displayed. Click the object in which we need to create these fields
  4. Go to Custom Fields section and click 'New'
  5. Choose 'Picklist' for Data type and provide required information as below

  6. Save it and then in similar way click on 'New' in Custom Fields section and for Data type, choose 'Formula'
  7. Provide Field name and label, then select Return type as 'Text'
  8. Now, under 'Advanced Formula' section, write formula as below
     IMAGE(CASE( Status__c ,  
     'Open', '/resource/status/green.png',  
     'Closed', '/resource/status/red.png',  
     'Planning', '/resource/status/yellow.png',  
     ''), "rating")  
    

  9. And, for Blank Field Handling, select Treat blank fields as blanks'
  10. Provide the required access and also add it into the layouts

Step 4: Now, add this formula field in detail screen layout and also View if required.
Once you add it into the layout, you can see the same in detailed screen of a record. Also, if you add these fields in a View, it will be displayed as in below image


Monday, February 16, 2015

Restrict Record level Access in Salesforce

There are different approaches available to restrict access at different levels in Salesforce.

In this article we look into options available to restrict record level access in a object.

To restrict access at a record level, first we need to configure Organization-Wide Default (OWD) sharing of the object to 'Private'. This configuration once set, all the records will be private. Other users can't access them. Now, we open access using variety of means, like roles, groups, profiles ,sharing rules and manual sharing.

To configure OWD sharing, follow below steps.
  1. From Setup, click Security Controls > Sharing Settings.
  2. Under Organization Wide-Defaults, click Edit.
  3. Change the picklist next to the 'Custom object' to Private.
  4. Click Save

The check box is 'Grant Access Hierarchy'. If checked, access to a record will be provided to the Owner's top level hierarchy as per roles defined in the Organization.

Let us assume we already have some Roles and Profiles created as per our Org structure.

Now, to assign access to the records, we use 'Sharing Rules'. These are rules we define to provide access to record based on some criteria of data / owner.

We can provide access to a  Role. In some cases, we might need to provide access to multiple people of different Roles and Profiles. In such cases, we can create a User groups and provide access to the group through these rules.

To create a Sharing Rule, follow below steps,

  1. From Setup, click Security Controls > Sharing Settings.
  2. Under 'Custom Object' Sharing Rules, click New.
  3. In the Label field, Rule Nmae, provide relevant name.
  4. For Rule Type, select Based on Criteria.
  5. In Criteria, choose the criteria you are looking for, as a sample selecting the following values:
    • For Field, choose City.
    • For Operator, choose equal to.
    • For the Value type, enter 'Hyderabad'.
  6. For Share With, we have different options i.e. Roles / Groups. Choose Roles and Subordinates and select Warehouse Manager from the picklist.
  7. For Access Level, choose Read/Write.
 Once the rule is saved, a job will be executed to run the rule on the object we created. So, each time you update the rule, it is executed.

Internally, for every object we have 'object__Share' table with corresponding apex modal object. When a Sharing rule is executed, if the criteria is met on a record, corresponding access entries are entered into this table.

Irrespective of rules / criteria if we want to provide access on a record, we can provide through Manual sharing,  by using default 'Sharing' option available on detailed screen


To implement Manual Sharing, follow below steps
  1. Click on the record for which we want to add i.e. open detailed screen
  2. Click on 'Sharing' button available along with other default action buttons
  3. A list with available accesses for the record are displayed. click on 'Add'
  4. A screen to choose User / Role / Group is displayed. 
  5. Select the corresponding people / group to whom we need to provide access and click on Save

In this way we  can restrict access to a Record.

If we need to provide access to a record dynamically based  on a criteria where value and access mappings are dynamic, we can implement the above 'Manual Sharing' option using Apex.

We can create a Custom object to map criteria and corresponding access details. Now, using a trigger on our Object, upon insert or update, we validate the criteria and if true, add record to the 'Object__Share' table through Apex with corresponding details.


 if(/* Condition to validate */)  
       {  
         //If true,   
         TF_Location__Share jobShr = new TF_Location__Share();  
         // Set the ID of record being shared.  
         jobShr.ParentId = record.id;  
         // Set the ID of user or group being granted access.  
         jobShr.UserOrGroupId = '005j000000BYezb';  
         // Set the access level.  
         jobShr.AccessLevel = 'Read';  
         // Set rowCause to 'manual' for manual sharing.  
         // This line can be omitted as 'manual' is the default value for sharing objects.  
         jobShr.RowCause = Schema.TF_Location__Share.RowCause.Manual;  
         // Insert the sharing record and capture the save result.   
         // The false parameter allows for partial processing if multiple records passed into the operation.  
        Database.SaveResult sr = Database.insert(jobShr,false);  
        // Process the save results.  
        if(sr.isSuccess()){  
            // Indicates success  
        }  
       }  


Wednesday, December 31, 2014

Accessing / Controlling Form fields in Visualforce pages using Jquery

It's a most common requirement that we need to access Form fields using JavaScript in any web technologies, for different reasons. In Salesforce too we can access / control using JavaScript. Lets understand how to accomplish this using below example.

Problem Statement: We have an object named Locations in Salesforce in which we store location details, that includes Address, City, Province / State , Country, Geo Co-ordinates etc. So, in a new or edit screen of a record, we want to provide a map where user can pick the location and it should automatically fill all the available details into the fields and on top of it, user can modify if any changes needed, then Save the record.

Solution: One among the easiest ways to provide a solution for above problem is having a map in the Form screen using JQuery Maps API and upon location changed in the map, updating the details of location ( fetched using API ) into the existing fields using JavaScript by accessing  through DOM.

To do this, we need to create a Visualforce page as we can't directly add custom code into default form screens in Salesforce. You can follow below steps to accomplish it

  1. Login to Salesforce
  2. Under Logged in User name drop down, select 'Setup'
  3. In left navigation, under 'App Setup' section go to 'Develop' and then 'Pages'
  4. List of all Visaulforce Pages are displayed. Now click on New button
  5. Fill in all the basic details of the new Page
  6. In the Visualforce Markup section, add below code and save it.
 <apex:page id="LocationPage" standardcontroller="Location__c" tabstyle="Location__c">  
      <apex:form id="FormLocation" >  
           <apex:sectionheader title="Information" subtitle="{!if(Location__c.Id==null,'New Location',Location__c.Name)}"></apex:sectionheader>  
           <apex:pageblock mode="edit" id="locationPB" title="Location Edit">  
                <apex:pageblockbuttons >  
                     <apex:commandbutton action="{!save}" value="Save"></apex:commandbutton>  
                     <apex:commandbutton action="{!cancel}" value="Cancel"></apex:commandbutton>  
                </apex:pageblockbuttons>  
                <apex:pagemessages ></apex:pagemessages> <!-- displays all message generated by the component -->  
                <apex:pageblocksection id="AddressInformationPBS" title="Address Information">  
                     <apex:inputfield value="{!Location__c.Address__c}" id="Address" ></apex:inputfield>  
                     <apex:inputfield value="{!Location__c.Zone__c}" ></apex:inputfield>  
                     <apex:inputfield value="{!Location__c.City__c}" id="City" ></apex:inputfield>  
                     <apex:inputfield value="{!Location__c.Geo_Location__Latitude__s}" id="Latitude" ></apex:inputfield>  
                     <apex:inputfield value="{!Location__c.Province__c}" id="Province" ></apex:inputfield>  
                     <apex:inputfield value="{!Location__c.Geo_Location__Longitude__s}" id="Longitude" ></apex:inputfield>  
                     <apex:inputfield value="{!Location__c.Country_Code__c}" id="Country" ></apex:inputfield>  
                     <apex:inputfield value="{!Location__c.Zip_Code__c}" id="Zip" ></apex:inputfield>  
                </apex:pageblocksection>  
                <apex:pageblocksection id="AddressPickerPBS" title="Pick Address using Map">  
                     <div id='map' style='width:100%;height:200px;'></div>  
                     <script src="https://code.jquery.com/jquery-1.10.2.min.js"></script>  
                     <script type="text/javascript" src='https://maps.google.com/maps/api/js?sensor=false&libraries=places'></script>  
                     <script src="https://rawgit.com/Logicify/jquery-locationpicker-plugin/master/locationpicker.jquery.js"></script>  
                     <script>  
                          $('#map').locationpicker({  
                               location: {    
                                    latitude: {!if(Location__c.Geo_Location__Latitude__s==null,17.4512887508432,Location__c.Geo_Location__Latitude__s)},  
                                    longitude: {!if(Location__c.Geo_Location__Longitude__s==null,78.38132679614262,Location__c.Geo_Location__Longitude__s)}  
                                    },  
                               radius: 100,  
                               onchanged: function (currentLocation, radius, isMarkerDropped) {  
                                    var addressComponents = $(this).locationpicker('map').location.addressComponents;  
                                    $('#LocationPage\\:FormLocation\\:locationPB\\:AddressInformationPBS\\:Address').val(addressComponents.addressLine1);  
                                    $('#LocationPage\\:FormLocation\\:locationPB\\:AddressInformationPBS\\:City').val(addressComponents.city);  
                                    $('#LocationPage\\:FormLocation\\:locationPB\\:AddressInformationPBS\\:Province').val(addressComponents.stateOrProvince);  
                                    $('#LocationPage\\:FormLocation\\:locationPB\\:AddressInformationPBS\\:Zip').val(addressComponents.postalCode);  
                                    $('#LocationPage\\:FormLocation\\:locationPB\\:AddressInformationPBS\\:Country').val(addressComponents.country);  
                                    $('#LocationPage\\:FormLocation\\:locationPB\\:AddressInformationPBS\\:Latitude').val($(this).locationpicker('map').location.latitude);  
                                    $('#LocationPage\\:FormLocation\\:locationPB\\:AddressInformationPBS\\:Longitude').val($(this).locationpicker('map').location.longitude);  
                               }  
                          });  
                     </script>  
                </apex:pageblocksection>  
           </apex:pageblock>  
      </apex:form>  
 </apex:page>  

Most of the code is Visualforce Markup. All tags used in it are basic default ones used for building a form. Most of the tags are self explanatory by their names.  Lets understand some important tags we used in above code along with the Javascript.

As mentioned in problem statement, we are creating Visualforce page for a custom object 'Location__c' as mentioned in 'StandardController' attribute of 'Page' tag.

 <apex:pageblockbuttons >  
      <apex:commandbutton action="{!save}" value="Save"></apex:commandbutton>  
      <apex:commandbutton action="{!cancel}" value="Cancel"></apex:commandbutton>  
 </apex:pageblockbuttons>  

Command buttons are the action buttons displayed for a page on top and bottom of the form. We added the default 'Save' and 'Cancel' actions provided for any object by Salesforce.

 <apex:pageblocksection id="AddressInformationPBS" title="Address Information">  
      <apex:inputfield value="{!Location__c.Address__c}" id="Address" ></apex:inputfield>  
      <apex:inputfield value="{!Location__c.Zone__c}" ></apex:inputfield>  
      ......
 </apex:pageblocksection>  

From above code we can understand that we are using 8 custom fields in the 'Location' Custom object to store the detailed address information of the location.
 
'InputField' tag automatically displays the corresponding control of the field , along with data if it is used in edit screen.

 <script>  
      $('#map').locationpicker({  
           location: {    
                latitude: {!if(Location__c.Geo_Location__Latitude__s==null,17.4512887508432,Location__c.Geo_Location__Latitude__s)},  
                longitude: {!if(Location__c.Geo_Location__Longitude__s==null,78.38132679614262,Location__c.Geo_Location__Longitude__s)}  
                },  
           radius: 100,  
           onchanged: function (currentLocation, radius, isMarkerDropped) {  
                var addressComponents = $(this).locationpicker('map').location.addressComponents;  
                $('#LocationPage\\:FormLocation\\:locationPB\\:AddressInformationPBS\\:Address').val(addressComponents.addressLine1);  
                $('#LocationPage\\:FormLocation\\:locationPB\\:AddressInformationPBS\\:City').val(addressComponents.city);  
                ...
           }  
      });  
 </script>  

Above script is the default configuration of the 'Jquery Locationpicker' plugin. You can understnad more about this plugin  at this link, Jquery Locationpicker

Most important code to understand in above block is accessing fields.

$('#LocationPage\\:FormLocation\\:locationPB\\:AddressInformationPBS\\:Address').val('...');

In Salesforce, for a HTML Control, DOM Id is generated dynamically. A control ID has all the parent sections' IDs hierarchically with colon ( : ) separated. 

So, in our above example, HTML rendered ID of a control ( Client side ID ) is

"Page ID:Form ID:PageBlock ID:PageBlockSection ID:Control ID"

If you are adding any extra section or removing some section, ensure these blocks are updated.

Now, you can set this page as default New / Edit form by overriding the existing buttons in the 'Location' Object. This can be accomplished using below steps,

  1. Login to Salesforce
  2. Under Logged in User name drop down, select 'Setup'
  3. In left navigation, under 'App Setup' section go to 'Create' and then 'Objects'
  4. All the custom objects are listed. Click on 'Location' object
  5.  Go to 'Buttons, Links and Actions' section and Edit the existing buttons 'New' and "Edit'
  6. Now Choose 'Visualforce Page' radio option and select the newly created page from the drop down and save it.
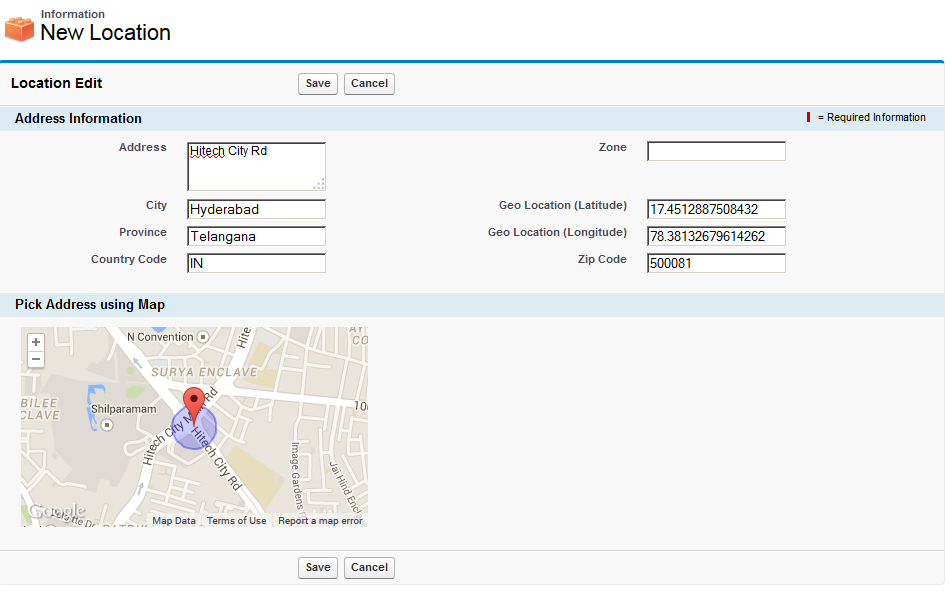
Now when you click on New or Edit record of Locations, screen will be displayed as below.
Try changing the point displayed in map. It automatically updated above fields. Now user can change is any information to be updated and then save it accordingly.

Friday, December 26, 2014

Display maps in Salesforce Record View screen

Problem Statement:  
  We have a Custom Object to maintain 'Shipment details', which has 'To Address' and 'From Address' details along with other information in Salesforce.We need to display these details on a Map along with other information in the Detailed screen.

Approach we Used:
 Its very easy to display it on maps. We followed below steps to implement it.
  1.  Create a Visualforce Page  to display map using Google Maps API with Javascript.
    1. To create new Visual page, click on setup, then in left navigation pane, go to Build > Develop > Pages
    2. List of all Visual pages are displayed. Click on New and provide required fields
    3. Now, paste below code in the Markup Block
        
         
       <apex:page standardController="<<Custom Object API Name>>">  
       <apex:pageBlock >  
       <script src="https://maps.googleapis.com/maps/api/js?v=3.exp"></script>  
       <script>  
            var directionsDisplay;  
            var directionsService = new google.maps.DirectionsService();  
            var map;  
            function initialize() {  
             directionsDisplay = new google.maps.DirectionsRenderer();  
             var chicago = new google.maps.LatLng(41.850033, -87.6500523);  
             var mapOptions = {  
                 zoom:7,  
                 center: chicago  
             };  
             map = new google.maps.Map(document.getElementById('map'), mapOptions);  
             directionsDisplay.setMap(map);  
             var request = {  
                  origin:new google.maps.LatLng({!<<Custom Object API Name>>.From_Geo_Location__Latitude__s}, {!<<Custom Object API Name>>.From_Geo_Location__Longitude__s}),  
                  destination:new google.maps.LatLng({!<<Custom Object API Name>>.To_Geo_Location__Latitude__s}, {!<<Custom Object API Name>>.To_Geo_Location__Longitude__s}),  
                  travelMode: google.maps.TravelMode.DRIVING  
             };  
             directionsService.route(request, function(response, status) {  
                 if (status == google.maps.DirectionsStatus.OK) {  
                  directionsDisplay.setDirections(response);  
                 }  
             });  
            }  
            google.maps.event.addDomListener(window, 'load', initialize);       
       </script>  
       <div style='height:230px;width:100%'>  
         <div class='map' id="map"></div>  
       </div>  
       </apex:pageBlock>  
       </apex:page>  
      
    4. For Origin and Destination values in above code we provided the latitude and longitude coordinates of the data stored in the record
    5. Save the page.
  2.  This page will be listed in the layout screen of the custom object for which we are creating
  3. Add this page into any section of layout where we want to display.
  4. To add this, Click on Setup, in left navigation pane, go to Create > Objects
  5. All the custom objects are displayed, select the Object on which we are working and go to 'Page Layouts' section and click Edit 
  6. Add a new section and drop the listed page into it and Save.
  7. Now click on any record of the custom object to see the map we added with directions between the 2 locations of the same reord