Here, I will walk through step by step process for creating and deploying Windows Service using Visual Studio 2013 in C#.
Before we go in details, just to understand on a high level, a Windows Service is a computer program that runs in the background with out End User interference. It can be started automatically when the system boots.
Mainly we use Windows Service to run Scheduled Jobs, like sending Daily Report emails to Managers , Newsletters to the team.
In this demo, I created Windows Service in C# using Visual studio 2013 and scheduled it for every minute.
Step 1: Open Visual Studio and Create a New ‘Windows Service’ Project available in Visual C#, Windows Category.

Step 2: In the Project solution, we will be able to see multiple files, one of them is Service1.cs. Rename it as per the functionality we are going to implement.

Step 3: Go to Code View screen by clicking on 'click here to switch to code view'.
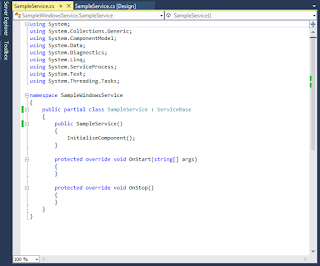
Here we would see 3 methods auto populated. The first one is on Initiation of the service.
OnStart method is executed when we start the Service, this could be automated or manual event.
OnStop method is executed when the service is stopped, could be manual by end user or when syste m shuts down or some automated process.
Step 4: Here we have to add the timer to schedule the functionality or job which we want to execute at regular interval. Below is the sample code
"WriteLog" is a function used to update Log file maintained in the installation folder location.
"OnTimer" is the event handler fired upon reaching configured duration
And, the timer is setup in OnStart method, so when the service is started, Timer will be started and the job is scheduled.
Step 5: Now, we need to add an installer to the service. To do this, right click on the Service.cs file and click on 'Add Installer'
 A new file Projectinstaller.cs is added and it has 2 controls, 'SerivceInstaller' and 'ServiceProcessInstaller'
Step 6: Go to Properties of ServiceInstaller and provide Service name and description. Also, Change start type to Manual.

Step 7: Now, go to properties of SercieProcessInstaller and set Account to LocalService. The service will be running on this account. Based on your job's access requirements, use the Account.

Step 8: With these steps, the Windows service is ready and we need to Deploy / Install it. To do this, Build the solution and in the Bin folder, we will have an EXE file as in below image

Step 9: Now, open Visual Studio Command Prompt and go to the file location where we have the exe file as in above step. And to install, the command we use is 'InstallUtil.exe <exe file>'

Step 10: After we execute above command, we get successfully installed message on command prompt and then open the System services to view installed service. To open, run 'Services.msc' in System Run .
 Upon clicking on Start, the service will be started the job is scheduled. We can see the logs in the Log file created in same folder.
To uninstall the Service, the command we use is 'InstallUtil.exe /u <exe file>'. To execute this command, go to the same folder where we have the exe file.

Happy Coding! :-)
Before we go in details, just to understand on a high level, a Windows Service is a computer program that runs in the background with out End User interference. It can be started automatically when the system boots.
Mainly we use Windows Service to run Scheduled Jobs, like sending Daily Report emails to Managers , Newsletters to the team.
In this demo, I created Windows Service in C# using Visual studio 2013 and scheduled it for every minute.
Step 1: Open Visual Studio and Create a New ‘Windows Service’ Project available in Visual C#, Windows Category.

Step 2: In the Project solution, we will be able to see multiple files, one of them is Service1.cs. Rename it as per the functionality we are going to implement.

Step 3: Go to Code View screen by clicking on 'click here to switch to code view'.

Here we would see 3 methods auto populated. The first one is on Initiation of the service.
OnStart method is executed when we start the Service, this could be automated or manual event.
OnStop method is executed when the service is stopped, could be manual by end user or when syste m shuts down or some automated process.
Step 4: Here we have to add the timer to schedule the functionality or job which we want to execute at regular interval. Below is the sample code
using System;
using System.IO;
using System.ServiceProcess;

namespace TimesheetTaskCreation
{
    public partial class TaskCreation : ServiceBase
    {
        public TaskCreation()
        {
            InitializeComponent();
        }

        protected override void OnStart(string[] args)
        {
            WriteLog("Service Started.");

            // Set up a timer to trigger every minute.
            System.Timers.Timer timer = new System.Timers.Timer();
            timer.Interval = 60000 * 1; //1 min
            timer.Elapsed += new System.Timers.ElapsedEventHandler(this.OnTimer);
            timer.Start();

        }

        public void OnTimer(object sender, System.Timers.ElapsedEventArgs args)
        {
            // TODO: Insert monitoring activities here.
            WriteLog("Performing Service Action.");

            //Perform the actions here
        }

        protected override void OnStop()
        {
            WriteLog("Service Stopped.");
        }

        private void WriteLog(string text)
        {
            StreamWriter sw = null;
            try
            {
                sw = new StreamWriter(AppDomain.CurrentDomain.BaseDirectory + "LogFile.txt", true);
                sw.WriteLine(DateTime.Now.ToString() + ":" + text);
                sw.Flush();
                sw.Close();
            }
            catch (Exception e)
            {

            }
        }
    }
}
"WriteLog" is a function used to update Log file maintained in the installation folder location.
"OnTimer" is the event handler fired upon reaching configured duration
And, the timer is setup in OnStart method, so when the service is started, Timer will be started and the job is scheduled.

Step 6: Go to Properties of ServiceInstaller and provide Service name and description. Also, Change start type to Manual.

Step 7: Now, go to properties of SercieProcessInstaller and set Account to LocalService. The service will be running on this account. Based on your job's access requirements, use the Account.

Step 8: With these steps, the Windows service is ready and we need to Deploy / Install it. To do this, Build the solution and in the Bin folder, we will have an EXE file as in below image

Step 9: Now, open Visual Studio Command Prompt and go to the file location where we have the exe file as in above step. And to install, the command we use is 'InstallUtil.exe <exe file>'

Step 10: After we execute above command, we get successfully installed message on command prompt and then open the System services to view installed service. To open, run 'Services.msc' in System Run .

To uninstall the Service, the command we use is 'InstallUtil.exe /u <exe file>'. To execute this command, go to the same folder where we have the exe file.
Happy Coding! :-)