It's a most common requirement that we need to access Form fields using JavaScript in any web technologies, for different reasons. In Salesforce too we can access / control using JavaScript. Lets understand how to accomplish this using below example.
Problem Statement: We have an object named Locations in Salesforce in which we store location details, that includes Address, City, Province / State , Country, Geo Co-ordinates etc. So, in a new or edit screen of a record, we want to provide a map where user can pick the location and it should automatically fill all the available details into the fields and on top of it, user can modify if any changes needed, then Save the record.
Solution: One among the easiest ways to provide a solution for above problem is having a map in the Form screen using JQuery Maps API and upon location changed in the map, updating the details of location ( fetched using API ) into the existing fields using JavaScript by accessing through DOM.
To do this, we need to create a Visualforce page as we can't directly add custom code into default form screens in Salesforce. You can follow below steps to accomplish it
Most of the code is Visualforce Markup. All tags used in it are basic default ones used for building a form. Most of the tags are self explanatory by their names. Lets understand some important tags we used in above code along with the Javascript.
As mentioned in problem statement, we are creating Visualforce page for a custom object 'Location__c' as mentioned in 'StandardController' attribute of 'Page' tag.
Command buttons are the action buttons displayed for a page on top and bottom of the form. We added the default 'Save' and 'Cancel' actions provided for any object by Salesforce.
From above code we can understand that we are using 8 custom fields in the 'Location' Custom object to store the detailed address information of the location.
'InputField' tag automatically displays the corresponding control of the field , along with data if it is used in edit screen.
Above script is the default configuration of the 'Jquery Locationpicker' plugin. You can understnad more about this plugin at this link, Jquery Locationpicker .
Most important code to understand in above block is accessing fields.
In Salesforce, for a HTML Control, DOM Id is generated dynamically. A control ID has all the parent sections' IDs hierarchically with colon ( : ) separated.
So, in our above example, HTML rendered ID of a control ( Client side ID ) is
"Page ID:Form ID:PageBlock ID:PageBlockSection ID:Control ID"
If you are adding any extra section or removing some section, ensure these blocks are updated.
Now, you can set this page as default New / Edit form by overriding the existing buttons in the 'Location' Object. This can be accomplished using below steps,
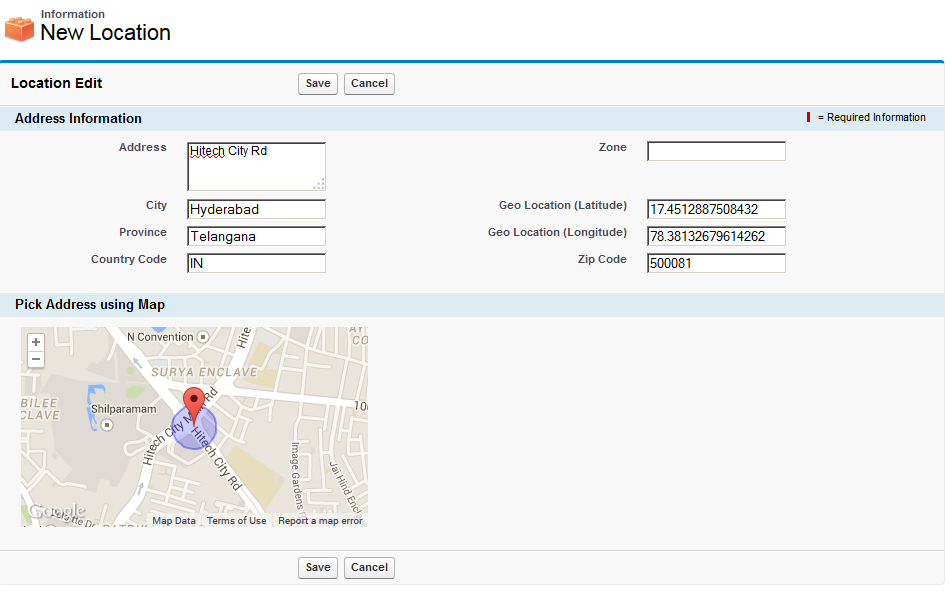 Try changing the point displayed in map. It automatically updated above fields. Now user can change is any information to be updated and then save it accordingly.
Problem Statement: We have an object named Locations in Salesforce in which we store location details, that includes Address, City, Province / State , Country, Geo Co-ordinates etc. So, in a new or edit screen of a record, we want to provide a map where user can pick the location and it should automatically fill all the available details into the fields and on top of it, user can modify if any changes needed, then Save the record.
Solution: One among the easiest ways to provide a solution for above problem is having a map in the Form screen using JQuery Maps API and upon location changed in the map, updating the details of location ( fetched using API ) into the existing fields using JavaScript by accessing through DOM.
To do this, we need to create a Visualforce page as we can't directly add custom code into default form screens in Salesforce. You can follow below steps to accomplish it
- Login to Salesforce
- Under Logged in User name drop down, select 'Setup'
- In left navigation, under 'App Setup' section go to 'Develop' and then 'Pages'
- List of all Visaulforce Pages are displayed. Now click on New button
- Fill in all the basic details of the new Page

- In the Visualforce Markup section, add below code and save it.
 <apex:page id="LocationPage" standardcontroller="Location__c" tabstyle="Location__c">
      <apex:form id="FormLocation" >
           <apex:sectionheader title="Information" subtitle="{!if(Location__c.Id==null,'New Location',Location__c.Name)}"></apex:sectionheader>
           <apex:pageblock mode="edit" id="locationPB" title="Location Edit">
                <apex:pageblockbuttons >
                     <apex:commandbutton action="{!save}" value="Save"></apex:commandbutton>
                     <apex:commandbutton action="{!cancel}" value="Cancel"></apex:commandbutton>
                </apex:pageblockbuttons>
                <apex:pagemessages ></apex:pagemessages> <!-- displays all message generated by the component -->
                <apex:pageblocksection id="AddressInformationPBS" title="Address Information">
                     <apex:inputfield value="{!Location__c.Address__c}" id="Address" ></apex:inputfield>
                     <apex:inputfield value="{!Location__c.Zone__c}" ></apex:inputfield>
                     <apex:inputfield value="{!Location__c.City__c}" id="City" ></apex:inputfield>
                     <apex:inputfield value="{!Location__c.Geo_Location__Latitude__s}" id="Latitude" ></apex:inputfield>
                     <apex:inputfield value="{!Location__c.Province__c}" id="Province" ></apex:inputfield>
                     <apex:inputfield value="{!Location__c.Geo_Location__Longitude__s}" id="Longitude" ></apex:inputfield>
                     <apex:inputfield value="{!Location__c.Country_Code__c}" id="Country" ></apex:inputfield>
                     <apex:inputfield value="{!Location__c.Zip_Code__c}" id="Zip" ></apex:inputfield>
                </apex:pageblocksection>
                <apex:pageblocksection id="AddressPickerPBS" title="Pick Address using Map">
                     <div id='map' style='width:100%;height:200px;'></div>
                     <script src="https://code.jquery.com/jquery-1.10.2.min.js"></script>
                     <script type="text/javascript" src='https://maps.google.com/maps/api/js?sensor=false&libraries=places'></script>
                     <script src="https://rawgit.com/Logicify/jquery-locationpicker-plugin/master/locationpicker.jquery.js"></script>
                     <script>
                          $('#map').locationpicker({
                               location: {
                                    latitude: {!if(Location__c.Geo_Location__Latitude__s==null,17.4512887508432,Location__c.Geo_Location__Latitude__s)},
                                    longitude: {!if(Location__c.Geo_Location__Longitude__s==null,78.38132679614262,Location__c.Geo_Location__Longitude__s)}
                                    },
                               radius: 100,
                               onchanged: function (currentLocation, radius, isMarkerDropped) {
                                    var addressComponents = $(this).locationpicker('map').location.addressComponents;
                                    $('#LocationPage\\:FormLocation\\:locationPB\\:AddressInformationPBS\\:Address').val(addressComponents.addressLine1);
                                    $('#LocationPage\\:FormLocation\\:locationPB\\:AddressInformationPBS\\:City').val(addressComponents.city);
                                    $('#LocationPage\\:FormLocation\\:locationPB\\:AddressInformationPBS\\:Province').val(addressComponents.stateOrProvince);
                                    $('#LocationPage\\:FormLocation\\:locationPB\\:AddressInformationPBS\\:Zip').val(addressComponents.postalCode);
                                    $('#LocationPage\\:FormLocation\\:locationPB\\:AddressInformationPBS\\:Country').val(addressComponents.country);
                                    $('#LocationPage\\:FormLocation\\:locationPB\\:AddressInformationPBS\\:Latitude').val($(this).locationpicker('map').location.latitude);
                                    $('#LocationPage\\:FormLocation\\:locationPB\\:AddressInformationPBS\\:Longitude').val($(this).locationpicker('map').location.longitude);
                               }
                          });
                     </script>
                </apex:pageblocksection>
           </apex:pageblock>
      </apex:form>
 </apex:page>
Most of the code is Visualforce Markup. All tags used in it are basic default ones used for building a form. Most of the tags are self explanatory by their names. Lets understand some important tags we used in above code along with the Javascript.
As mentioned in problem statement, we are creating Visualforce page for a custom object 'Location__c' as mentioned in 'StandardController' attribute of 'Page' tag.
 <apex:pageblockbuttons >
      <apex:commandbutton action="{!save}" value="Save"></apex:commandbutton>
      <apex:commandbutton action="{!cancel}" value="Cancel"></apex:commandbutton>
 </apex:pageblockbuttons>
Command buttons are the action buttons displayed for a page on top and bottom of the form. We added the default 'Save' and 'Cancel' actions provided for any object by Salesforce.
 <apex:pageblocksection id="AddressInformationPBS" title="Address Information">
      <apex:inputfield value="{!Location__c.Address__c}" id="Address" ></apex:inputfield>
      <apex:inputfield value="{!Location__c.Zone__c}" ></apex:inputfield>
      ......
 </apex:pageblocksection>
From above code we can understand that we are using 8 custom fields in the 'Location' Custom object to store the detailed address information of the location.
'InputField' tag automatically displays the corresponding control of the field , along with data if it is used in edit screen.
 <script>
      $('#map').locationpicker({
           location: {
                latitude: {!if(Location__c.Geo_Location__Latitude__s==null,17.4512887508432,Location__c.Geo_Location__Latitude__s)},
                longitude: {!if(Location__c.Geo_Location__Longitude__s==null,78.38132679614262,Location__c.Geo_Location__Longitude__s)}
                },
           radius: 100,
           onchanged: function (currentLocation, radius, isMarkerDropped) {
                var addressComponents = $(this).locationpicker('map').location.addressComponents;
                $('#LocationPage\\:FormLocation\\:locationPB\\:AddressInformationPBS\\:Address').val(addressComponents.addressLine1);
                $('#LocationPage\\:FormLocation\\:locationPB\\:AddressInformationPBS\\:City').val(addressComponents.city);
                ...
           }
      });
 </script>
Above script is the default configuration of the 'Jquery Locationpicker' plugin. You can understnad more about this plugin at this link, Jquery Locationpicker .
Most important code to understand in above block is accessing fields.
$('#LocationPage\\:FormLocation\\:locationPB\\:AddressInformationPBS\\:Address').val('...');In Salesforce, for a HTML Control, DOM Id is generated dynamically. A control ID has all the parent sections' IDs hierarchically with colon ( : ) separated.
So, in our above example, HTML rendered ID of a control ( Client side ID ) is
"Page ID:Form ID:PageBlock ID:PageBlockSection ID:Control ID"
If you are adding any extra section or removing some section, ensure these blocks are updated.
Now, you can set this page as default New / Edit form by overriding the existing buttons in the 'Location' Object. This can be accomplished using below steps,
- Login to Salesforce
- Under Logged in User name drop down, select 'Setup'
- In left navigation, under 'App Setup' section go to 'Create' and then 'Objects'
- All the custom objects are listed. Click on 'Location' object
- Go to 'Buttons, Links and Actions' section and Edit the existing buttons 'New' and "Edit'
- Now Choose 'Visualforce Page' radio option and select the newly created page from the drop down and save it.


