Tuesday, March 31, 2020

Handling Multi Select Field Values in Microsoft Flows

It's tricky to use Multi Select fields, could be a Choice field / People Picker. It's because the values returned in these field types are JSON Object Arrays, thus if we try to use field directly in an email action or other, it would auto add Apply to Each and extracts individual item as in below image.


And the Sample JSON is as below.
 [  
  {  
   "@odata.type": "#Microsoft.Azure.Connectors.SharePoint.SPListExpandedReference",  
   "Id": 1,  
   "Value": "Agriculture"  
  },  
  {  
   "@odata.type": "#Microsoft.Azure.Connectors.SharePoint.SPListExpandedReference",  
   "Id": 3,  
   "Value": "Political"  
  },  
  {  
   "@odata.type": "#Microsoft.Azure.Connectors.SharePoint.SPListExpandedReference",  
   "Id": 5,  
   "Value": "Engineering"  
  }  
 ]  

In order to use the values, we first need to extract Values from above JSON and join the values.
There are couple of ways to implement it as below

Approach 1:
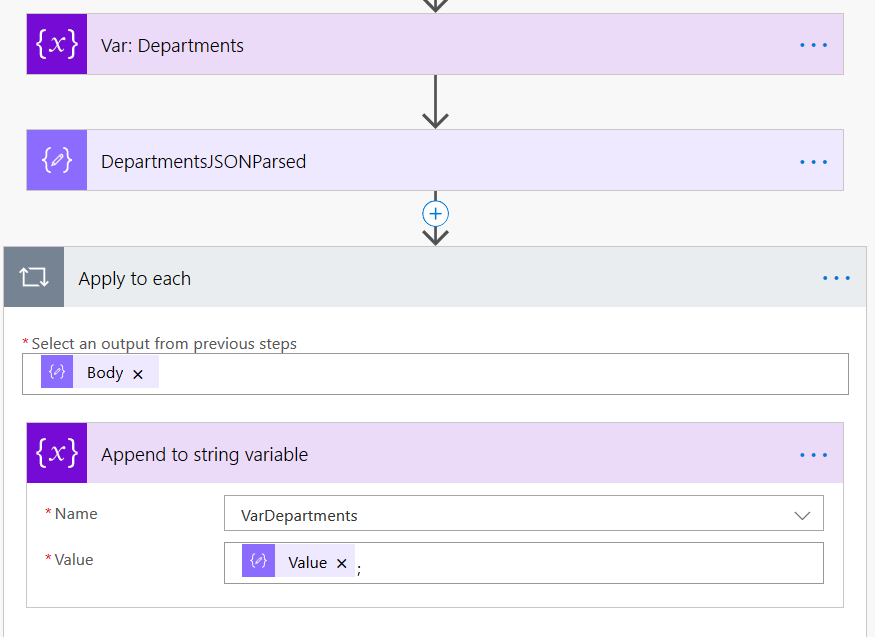
  • Initialize Variable of type String to hold the value
  • Use Parse JSON Action to parse the JSON object data, i.e. the multi choice field
  • Use Apply to Each to go through the Parsed JSON response
  • Inside Loop action, add Append to String action and set the Value property of Parsed Object to created variable
  • Now the variable will have selected values with semi-column separated and can be used in any action as a string.

If we don't want to use Parse JSON action, we can directly refer the Multi Choice field in Apply to Each. By doing so, we won't be able to select the Value property from JSON object, but can use simple expression to fetch it, item()?['Value']


Approach 2: (Suggested.)

  • Use Select action to select Value property from the JSON object array, here we use expression item()?['Value']
  • Use Join Action with semi column separator to join the values from above action


Second approach executes much quicker compared to other as we don't use Loop action here.


And, if the field is People Picker, the JSON data sample is as below and instead of 'Value' property in above expressions, we can choose Email / DisplayName as per requirement.
 [  
  {  
   "@odata.type": "#Microsoft.Azure.Connectors.SharePoint.SPListExpandedUser",  
   "Claims": "i:0#.f|membership|demo1@sptest.onmicrosoft.com",  
   "DisplayName": "LaxmiNarayana Ruttala",  
   "Email": "demo1@sptest.onmicrosoft.com",  
   "Picture": "https://sptest.sharepoint.com/_layouts/15/UserPhoto.aspx?Size=L&AccountName=demo1@sptest.onmicrosoft.com",  
   "Department": null,  
   "JobTitle": null  
  },  
  {  
   "@odata.type": "#Microsoft.Azure.Connectors.SharePoint.SPListExpandedUser",  
   "Claims": "i:0#.f|membership|demo2@sptest.onmicrosoft.com",  
   "DisplayName": "Demo User",  
   "Email": "demo2@sptest.onmicrosoft.com",  
   "Picture": "https://sptest.sharepoint.com/_layouts/15/UserPhoto.aspx?Size=L&AccountName=demo2@sptest.onmicrosoft.com",  
   "Department": null,  
   "JobTitle": null  
  }  
 ]  


Wednesday, July 17, 2019

Validation Rules using Date fields on a Sharepoint List

I have a requirement to restrict users for entering Review date as below

  1. Only Thursdays are allowed
  2. Need to skip the coming first Thursday
  3. Can't be farther from 4 Thursdays from today
I used the available validation settings rule to restrict user and it is as below. For this, created a date field 'CreatedDate' with default value set to today and hidden it in form as the 'Created' column not working in Validation rules in Edit forms.

=IF(WEEKDAY([ReviewDate])=5,IF([ReviewDate]-[CreatedDate]<28,IF([ReviewDate]-[CreatedDate]>=7,TRUE,FALSE),FALSE),FALSE)

In above formula I used Review date and also the created date.
  1. WEEKDAY([ReviewDate])=5 - its to make sure the selected date is thursday only, the weekdays start from Sunday with 1
  2. [ReviewDate]-[Created]<28 - We are making sure the review date is no more than 28 days so that it doesn't cross 4 Thursdays.
  3. [ReviewDate]-[Created]>=7 - This is to restrict the user from selecting first Thursday

Monday, October 23, 2017

Briefing on NPM - nodejs

Node js is a Javascript runtime which allows us to execute Javscript without browser, thus allows us to use Javascript at server level / as a command prompt application.

Node JS also has NPM, short form of Node Package Ecosystem, which allows users to share Javascript libraries / frameworks to other developers and is being widely used across globe. NPM makes it simple to add / install any javascript framwork into the project and also helps in keeping the frameworks updated.

In this article we go through npm on a high level.

First, to install Node JS in your machine, open NodeJS.org and download the executable as per your Machine specs.


Once Node JS installed in the machine, it adds Node.js Command Prompt through which we execute the npm and node commands.

Using NPM

Upon installing Node Js, a new folder 'node_modules' in current user's user folder.
Eg: C:\Users\laxmi\node_modules 

As stated above, through npm, we can add / install any packages on the fly, without the need of going to the particular site and downloading the packages. We can install the files globally i.e. in node_modules folder or also locally, i.e. in a  project folder.

Let us run a sample install npm for jquery. Command as below
npm install <<Package name>>
This installs latest JQuery framework to the global folder "node_modules", here 3.2.1
We can now use these files in any of our projects. In order to install it locally, navigate the Node Command prompt to the corresponding folder and execute the same command.

In order to manage the NPM packages in better way, we have 'package.json'. This has some basic configuration attributes to provide info about Project, like project name, version, dependencies of the project, i.e. list of the frameworks being used.

in order to create basic package.json file, execute below command
npm init 
This command promts for details in it, about name, version, license. To avoid all these, add 'yes' or 'y' option to it.
npm init -yes
Sample package.json file is as below
{
  "version": "1.0.0",
  "name": "demo",
  "dependencies": {
    "jquery": "^3.2.1",
    "bootstrap": "3.1"
  }
}
Now if we run the npm install command, it installs all the dependencies into the project.

To learn more about npm, use below references.

https://docs.npmjs.com/

http://nodesource.com/blog/the-basics-of-package-json-in-node-js-and-npm/ 

Friday, May 19, 2017

Instantiation of a Page Reference in Apex, Salesforce

In many cases, after a custom action performed, we may need to redirect the page to a different page, could be another Visualforce page / standard Page like a list view of an object or any of default pages like view / edit page of a record or a new record entry page.

Page redirection happens in Apex code using PageReference class.

There are multiple ways to instantiate a page reference in Apex. Below are list of all possible ways.

Approach 1:
PageReference pageRef = new PageReference('***partialURL***');
PageReference pageRef = new PageReference('***FullURL***');

Eg:

PageReference pageRef = new PageReference('/apex/CustomPage1?id=xxxxxx');
PageReference pageRef = new PageReference('/a04');

PageReference pageRef = new PageReference('http://www.google.com');

Approach 2:
PageReference pageRef = Page.<<VF Page Name>>;

Eg:

PageReference pageRef = Page.CustomPage;
pageRef.getParameters().put('id','XXXXXXX');

Approach 3:
Refer stnadard pages of an Object / record

PageReference pageRef = new ApexPages.StandardController(recordObj).edit();
PageReference pageRef = new ApexPages.StandardController(recordObj).view();

Refer List view of an object

PageReference pageRef = new PageReference('/'+<<Object>>.sObjectType.getDescribe().getKeyPrefix());

PS: Try not to hard code URLs and use above available options to build the URLs.

Friday, April 21, 2017

Display Validation rule Errors on a Visualforce Page

One among the most useful features in Salesforce is Validation rules in an object. With Validation rules, e can provide a formula / conditional check and if it met, we display an error message to end user and thus stopping user from saving the record.  The advantage of validation rules is that it validates records when entered in forms and also through other means like data loader. So, if there are any conditions which are mandatory, better to have them in Validation rules, even though you have custom forms.

A simple example in my application is, we can't allow users to provide weight less than 1 LBS. To accomplish this, we added a validation rule as below.

And, in our application, we are having Visualforce pages for the forms as we have some complex functionalities which can't be accomplished through default layouts.

In order to display errors on forms like mandatory field / invalid value , we simply need to provide a visualforce component / tag "<apex:pagemessages />" in the layout as per our design. By adding this, upon save of an object, if there are any errors in data, they are listed in pagemessages section.

But, Validation rules, don't come under default errors of a data record. They actually through DML Exceptions. So, in order to show the validation errors, in the Apex class save method, we need to catch the  DML exceptions and just provide the exception to Apexpage messages. It parses the error messages and displays them in page messages. Below is sample code.

public class customController
{
    public object__C obj {get;set;}
    
    public customController(ApexPages.StandardController ctlr)
    {
        //Consturctor, define obj here.
    }
    
    public pagereference custommSave()
    {
        try
        {
            upsert obj;
            return new pagereference('/'+obj.id);
        }         
        catch(DmlException ex){
            ApexPages.addMessages(ex);
            return null;
        }
        catch(Exception ex){
            //Handle exception
            return null;
        }
    }
}

Happy coding!

Monday, February 13, 2017

Enable / Setup Search Service in Sharepoint through Powershell

Sharepoint has provided an easy approach through Central admin to enable Search service application, but the one known issue with it is, it creates a database on its own. we can also enable this using powershell commands. By doing this, we can provide our own name for the DB.

Below is the step by step commands to be executed to enable Search service using powershell.
 #Add-PSSnapin Microsoft.SharePoint.PowerShell  
 # 1.Setting up some initial variables.  
 write-host 1.Setting up some initial variables.  
 $SSAName = "InternalSearch"  
 $SSADatabase = "InternalSearchDB"  
 $saAppPoolName = "SecurityTokenServiceApplicationPool"  
 $SSI = get-spenterprisesearchserviceinstance -local  
 $err = $null  
 # Start Services search services for SSI  
 write-host Start Services search services for SSI  
 Start-SPEnterpriseSearchServiceInstance -Identity $SSI  
 Start-SPEnterpriseSearchQueryAndSiteSettingsServiceInstance $SSI  
 # 2.connect to an Application Pool.  
 write-host 2.connect to an Application Pool.  
 $AppPool = Get-SPServiceApplicationPool $saAppPoolName  
 # 3.Create the SearchApplication and set it to a variable  
 write-host 3.Create the SearchApplication and set it to a variable  
 $SearchApp = New-SPEnterpriseSearchServiceApplication -Name $SSAName -applicationpool $AppPool -databasename $SSADatabase  
 #4 Create search service application proxy  
 write-host 4 Create search service application proxy  
 $SSAProxy = new-spenterprisesearchserviceapplicationproxy -name $SSAName" ApplicationProxy" -Uri $SearchApp.Uri.AbsoluteURI  
 # 5.Provision Search Admin Component.  
 write-host 5.Provision Search Admin Component.  
 set-SPenterprisesearchadministrationcomponent -searchapplication $SearchApp -searchserviceinstance $SSI  
 # 6.Create a new Crawl Topology.  
 write-host 6.Create a new Crawl Topology.  
 $CrawlTopo = $SearchApp | New-SPEnterpriseSearchCrawlTopology  
 # 7.Create a new Crawl Store.  
 write-host 7.Create a new Crawl Store.  
 $CrawlStore = $SearchApp | Get-SPEnterpriseSearchCrawlDatabase  
 # 8.Create a new Crawl Component.  
 write-host 8.Create a new Crawl Component.  
 New-SPEnterpriseSearchCrawlComponent -CrawlTopology $CrawlTopo -CrawlDatabase $CrawlStore -SearchServiceInstance $SSI  
 # 9.Activate the Crawl Topology.  
 write-host 9.Activate the Crawl Topology.  
 do  
 {  
   $err = $null  
   $CrawlTopo | Set-SPEnterpriseSearchCrawlTopology -Active -ErrorVariable err  
   if ($CrawlTopo.State -eq "Active")  
   {  
     $err = $null  
   }  
   Start-Sleep -Seconds 10  
 }  
 until ($err -eq $null)  
 # 10.Create a new Query Topology.  
 write-host 10.Create a new Query Topology.  
 $QueryTopo = $SearchApp | New-SPenterpriseSEarchQueryTopology -partitions 1  
 # 11.Create a variable for the Query Partition  
 write-host 11.Create a variable for the Query Partition  
 $Partition1 = ($QueryTopo | Get-SPEnterpriseSearchIndexPartition)  
 # 12.Create a Query Component.  
 write-host 12.Create a Query Component.  
 New-SPEnterpriseSearchQueryComponent -indexpartition $Partition1 -QueryTopology $QueryTopo -SearchServiceInstance $SSI  
 # 13.Create a variable for the Property Store DB.  
 write-host 13.Create a variable for the Property Store DB.  
 $PropDB = $SearchApp | Get-SPEnterpriseSearchPropertyDatabase  
 # 14.Set the Query Partition to use the Property Store DB.  
 write-host 14.Set the Query Partition to use the Property Store DB.  
 $Partition1 | Set-SPEnterpriseSearchIndexPartition -PropertyDatabase $PropDB  
 # 15.Activate the Query Topology.  
 write-host 15.Activate the Query Topology.  
 do  
 {  
   $err = $null  
   $QueryTopo | Set-SPEnterpriseSearchQueryTopology -Active -ErrorVariable err -ErrorAction SilentlyContinue  
   Start-Sleep -Seconds 10  
   if ($QueryTopo.State -eq "Active")  
     {  
       $err = $null  
     }  
 }  
 until ($err -eq $null)  
 Write-host "Your search application $SSAName is now ready"  

Sunday, February 12, 2017

Migrate Sharepoint User Account to a New Login Name

There might be many occasions where we have to change the Users' account, could be the domain change or name change.

 Also another scenario is, if we have enabled Farm based authentication sharepoint adds some special characters to the account in the start like 'i:0#.w|' and if  we disabled it at later point, these names will not be changed.  We need to migrate / change the account names manually before people start using it. If not, we see 2 accounts for individual users.

we can achieve this functionality using Poweshell script. Considering above scenario, below is the script used to migrate resources in bulk when we are moving back form Farm based to windows authentication.

Below script is to get all the people present in the current system to a CSV File.
 function GetSPWebUsers($SiteCollectionURL)   
 {   
   [System.Reflection.Assembly]::LoadWithPartialName("Microsoft.SharePoint") > $null   
   $site = new-object Microsoft.SharePoint.SPSite($SiteCollectionURL)   
   $web = $site.openweb()   
   $siteUsers = $web.SiteUsers   
 @(foreach ($user in $siteUsers) {  
   $usergroup = New-Object System.Object  
      $usergroup | Add-Member -type NoteProperty -name AccountName -value $user.LoginName  
    Write-Output $usergroup   
 }) | Export-Csv c:\userlist.csv -NoTypeInformation   
   $web.Dispose()   
   $site.Dispose()   
 }   
 GetSPWebUsers $args[0]  
 #to execute, run the command as below  
 #GetSPWebUsers "http://<<site collection URL>>"  

By running above script, we get all the users' login names to a CSV file which will be used as an input of below code where we migrate individual users to the windows accounts which are formed by removing the starting set of special characters "i:0#.w|"
 Add-PSSnapin Microsoft.SharePoint.PowerShell  
 function MigrateUserOrGroups($csvFile)  
 {  
   #Getting the SPFarm object  
   $farm = Get-SPFarm  
   Import-Csv $csvFile | ForEach-Object{  
   Write-Host "Migrating User" $_.login "to" $_.login.Substring(7) -ForegroundColor Green  
   $farm.MigrateUserAccount( $_.login, $_.login.Substring(7), $false )  
   Write-Host "Migration Completed" -ForegroundColor Cyan  
   }  
   # $farm.Name  
 }  
 MigrateUserOrGroups $args[0]  
 #to execute, run the command as below  
 #MigrateUserOrGroups "c:\userlist.csv"  

You can modify the code as per your requirement.

Thursday, February 9, 2017

Display Files / Folders from a Document Library in Sharepoint

Below is the code to display documents / folders from a library in a Sharepoint environment, in a Tree View.

we are using SPServices and JQuery to achieve this  functionality.

 <div id='status' style='color:#d41414;display:none;padding:5px'>  
 </div>  
 <div id='main-block' style='display:none'>  
      <div><h3>Documents</h3></div>  
      <div id="0">  
      </div>  
 </div>  
 <script src="/InternalResources/jquery.min.js"></script>  
 <script src="/InternalResources/jquery.SPServices-0.7.2.min.js"></script>  
 <script language="javascript" type="text/javascript">  
 $(document).ready(function(){  
      //Enter the list name. If url is different, please update url variable too.  
      //Here code takes the current context and current website  
   var list = "TestFolders";  
   var url = list + "/";   
      createTree(url, 0, list);       
  });  
 function createTree(url, tagID, list){  
   //get the url to define the level of tree,  
   $().SPServices({  
   operation: "GetListItems",  
   async: false,  
   listName: list,  
   CAMLViewFields: "<ViewFields><FieldRef Name='Title' /><FieldRef Name='ID' /><FieldRef Name='EncodedAbsUrl' /></ViewFields>",  
   CAMLQueryOptions: "<QueryOptions><Folder>" + url + "</Folder></QueryOptions>",  
   completefunc: function (xData, Status) {  
           if($(xData.responseXML).SPFilterNode("z:row").length > 0) {  
                $("#"+tagID+"").append("<ul id='prime-"+tagID+"'>");  
                $(xData.responseXML).SPFilterNode("z:row").each(function() {  
                     var id = $(this).attr("ows_ID");  
                     var title = $(this).attr("ows_Title");     
                     var folder =  $(this).attr("ows_FileLeafRef").split(";#")[1];   
                     $("#prime-"+tagID+"").append("<li id='"+id+"'>" + " <a href='"+$(this).attr("ows_EncodedAbsUrl")+"'>" + folder + " </a></li>");                  
                 var thisFSObjType = $(this).attr("ows_FSObjType").split(";#")[1];  
                 if(thisFSObjType == 1) {  
                     //auto call the function createTree again, to get subfolders and files, assigning a new url/subfolder and id  
                     createTree(url+'/'+folder, id, list);       
                 }  
                 });  
                 $("#"+tagID+"").append("</ul>");  
                 $('#status').css('display','none');  
                 $('#main-block').css('display','block');  
           }  
           else     {  
                $('#status').html('No documents found.');  
                $('#status').css('display','block');  
           }  
      }  
  });   
 }  
 </script>  

Takeaways from Threshold limits of Sharepoint Lists

Few takeaways of Sharepoint Lists with large size.

  • If the data crossed the threshold value, applying filters on multiple indexed columns won’t display records. 
  • The first filter should be the Indexed column and only one indexed column should be used in a filter criteria
  • We cant index a column which has multi select enabled.
  • Threshold will not effect the performance of an individual item access.
  • If list crosses view threshold, we can't use it as lookup reference in any other list. 
Also, its better not to apply many permission restrictions  as it checks for individual permission set while fetching a record, which may impact performance.

For reference, use below links.

https://support.office.com/en-us/article/Manage-large-lists-and-libraries-in-SharePoint-b8588dae-9387-48c2-9248-c24122f07c59

https://support.office.com/en-us/article/Manage-lists-and-libraries-with-many-items-fba0c8b7-79bb-4ea4-9aff-bf145a689e8e


Monday, January 30, 2017

Run Sharepoint Designer 2013 using Different Account

We no more have an option to switch the user account in Sharepoint Designer 2013. In earlier version (2010), we have a direct option in designer, where we have a user icon to bottom left of the screen. Upon clicking it, it pops up a window to change user account.
In 2013, we can run / start the designer with a different account by providing the other user credentials. The steps to follow, is as below.
  • Open Sharepoint designer Installation folder, in general it would be in below location
    C:\Program Files(x86)\Microsoft Office\Office15
  • Select the file named 'SPDESIGN.EXE', hold the Shift key and Right click on it
  • In the Context menu, click on 'Run as different user'. This opens up a Windows security window
  • Provide the credentials of the user with which you need to run it.
Now, the designer will be opened with provided User.

Or, the other option is to login to the system it self with the other account.

Reference: https://support.microsoft.com/en-in/help/2738178/you-cannot-switch-the-user-account-in-sharepoint-designer-2013