Showing posts with label powershell. Show all posts

Wednesday, April 20, 2022

Azure Function to Update DLP Policy of a Sharepoint Site

In order to share an Online Sharepoint site with external users at restricted level, we can setup different Data loss Prevention (DLP) policies and include / exclude the specific Site in the policy. 

In this article, will walk through automate the process of  updating DLP policies of a Sharepoint site using Azure Function which can be referred from a Microsoft Flow or any external client like Service NOW. 

For DLP policy updates, we use Exchange Online Management module in Powershell. The only way to connect to exchange online / IPPS session is  using User account. So, we create an admin account in azure with MFA disabled (  Use Conditional Access to exclude ) and provide "Compliance Administrator" role.

Login to portal.azure.com and access Function App.  


Click on Create on top left. Select an existing Subscription. You may create a new Resource Group or choose from an existing ( this is used to group multiple resources together ). Provide Function App name, choose Powershell 7.0 as runtime stack and Click on Review + create. 

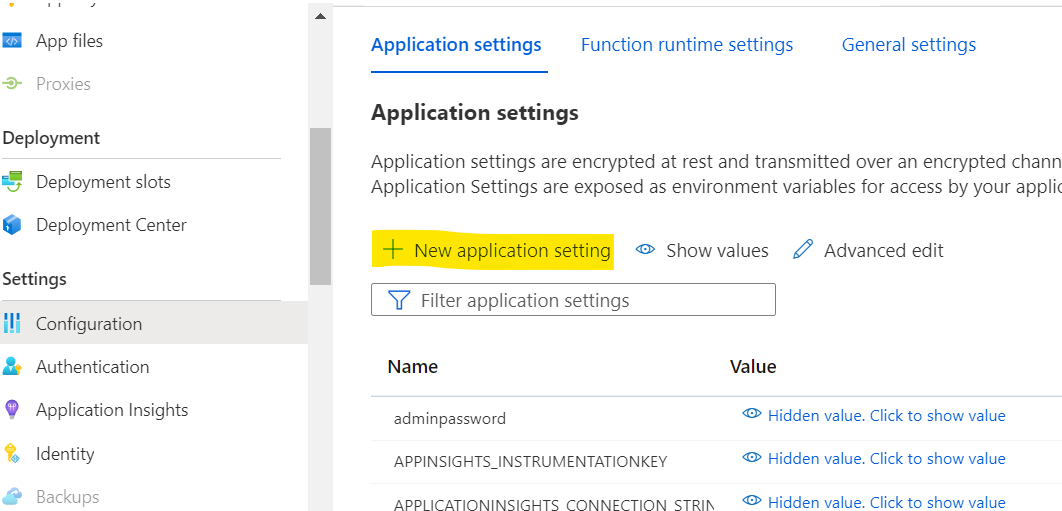
It may take a while to deploy. Once its ready, access Configuration on left nav of the app to store username and Password of admin account. Best practice is to refer from Key Vault to keep them secure.

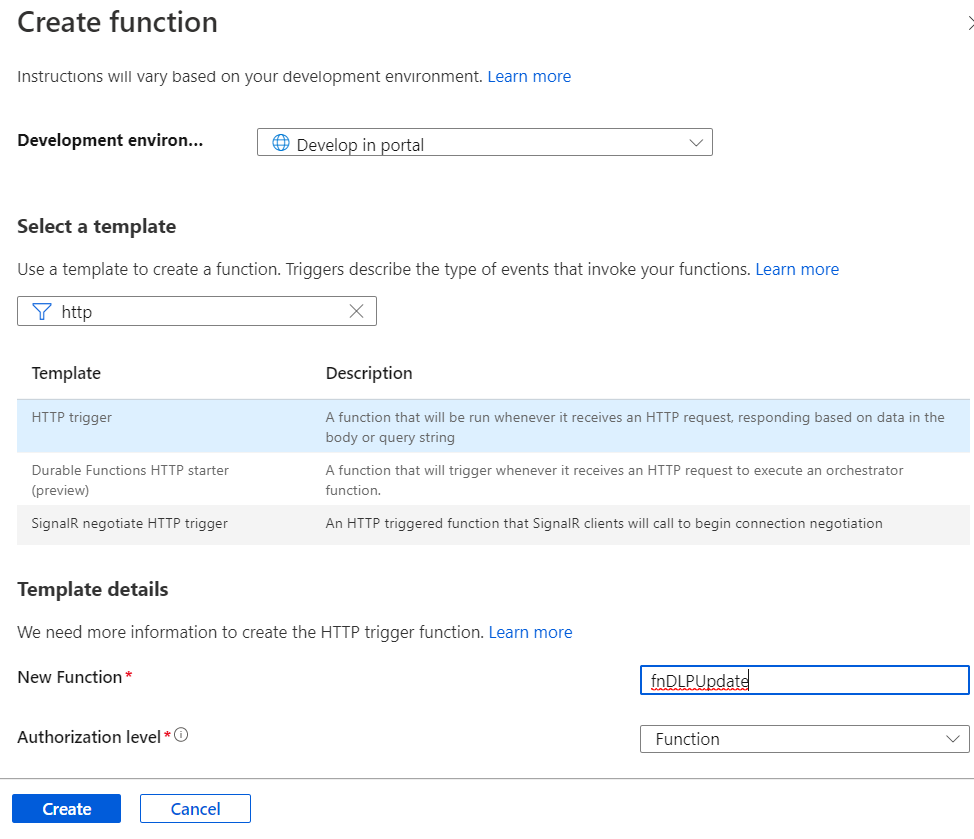
Access, functions on left nav, Create new function.

Choose, HTTP trigger template for the function. We will be able to call this service from Flow or any external client.

After Creation of function, fetch the URL using "Get Function URL" available in top nav. This will be the API url to consume from external systems. If we want to secure it further, can configure in API Management tool.

As we need Exchange Online Management Module, we can save the module to local machine and upload to the Azure function using FTP.  Once its available in server, use Import-module by referring it from server location. 

Now we should be able to write the code in browser by clicking on Code + Test on left navigation.

using namespace System.Net
# Input bindings are passed in via param block.
param($Request$TriggerMetadata)
# Write to the Azure Functions log stream.
Write-Host "PowerShell HTTP trigger function processed a request."

# Interact with the body of the request.
$inputSite = $Request.Body.sharepointSite
$accessType = $Request.Body.accessType
#sample set
#$inputSite = "https://luckyenv.sharepoint.com/sites/SampleSite"
#$accessType = "Site Level"

#admin center access is used to check if provided site exists in the tenant
$AdminCenterURL = "https://luckyenv-admin.sharepoint.com/"

Write-Host "provided site is $inputSite"
try {
    #make sure this account has MFA disabled to work in azure functions automated way.
    $user = $env:admin-username
    $pw = $env:admin-password | ConvertTo-SecureString -AsPlainText

    $cred = New-Object -TypeName System.Management.Automation.PSCredential -argumentlist $user$pw
    Write-Host "creds created."

    #connect to sharepoint tenant to validate site url
    Connect-PnPOnline -URL $AdminCenterURL -Credential $cred
    #Check if site exists
    $Site = Get-PnPTenantSite | Where { $_.Url -eq $inputSite }
    If ($Site -ne $null) {
        #disconnect from tenant
        Disconnect-PnPOnline
        try {
            # we need to import the 
            Import-Module "D:\Home\site\wwwroot\updatedlppolicy\modules\ExchangeOnlineManagement\2.0.5\ExchangeOnlineManagement.psd1"
            #Import-Module ExchangeOnlineManagement
    
            #Connect to the session
            Connect-IPPSSession -Credential $cred
            Write-Host "dlp policy session connected."
    
            #Exclude the site from default policy
            Set-DlpCompliancePolicy "Sharing Outside of Org" -AddSharePointLocationException $inputSite -ErrorAction Stop
            Write-Host "Site excluded from default policy"
    
            #We have 2 policies based on Access type pased to API
            if ( $accessType -eq "Site Level") {
                $dlpPolicy = "External Collaboration Entire Site"
            }
            else {
                $dlpPolicy = "External COllaboration Subset"
            }
            #Include the site to a specific policy
            Set-DlpCompliancePolicy $dlpPolicy  -AddSharePointLocation $inputSite -ErrorAction Stop
            Write-Host "dlp policies updated."
    
            #Disconnect ipps session. we need to disconnect, limited sessions allowed at a time
            Disconnect-ExchangeOnline -Confirm:$false -InformationAction Ignore -ErrorAction SilentlyContinue
    
            #Prepare response 
            $status = "Success"
            $body = "successfully updated the DLP policy."

        }
        catch {
            Write-host "Error caught and handled in catch."
            Write-Error $_
            Write-Error $_.ScriptStackTrace

            #Prepare response 
            $status = "Failed"
            $body = "An error occurred that could not be resolved. $_.Exception.Message"
    
            #Disconnect ipps session.
            Disconnect-ExchangeOnline -Confirm:$false -InformationAction Ignore -ErrorAction SilentlyContinue
    
        }
    }
    Else {
        #Prepare response 
        $status = "Failed"
        $body = "Provided Sharepoint site doesn't exist in the tenant."
        Disconnect-PnPOnline
    }
}
catch {
    Write-host "Error caught on high level and handled in catch."
    Write-Error $_
    Write-Error $_.ScriptStackTrace
    
    #Prepare response 
    $status = "Failed"
    $body = "An error occurred in connecting to system and could not be resolved. $_.Exception.Message"

    #Disconnect from tenant, if connected
    Disconnect-PnPOnline
    
}
# Associate values to output bindings by calling 'Push-OutputBinding'.
Push-OutputBinding -Name Response -Value ([HttpResponseContext]@{
        StatusCode = [HttpStatusCode]::OK
        Body       = @{Status = $statusMessage = $body } | ConvertTo-Json -Compress
    })


Updated comments for each line of the code to understand it in detail. In this API, we are passing 2 parameters, one is site url and other is access type, could be at site level / doc level. Based on Access type, we choose the DLP policy of the site to be updated to.

Happy coding :-)

Monday, February 13, 2017

Enable / Setup Search Service in Sharepoint through Powershell

Sharepoint has provided an easy approach through Central admin to enable Search service application, but the one known issue with it is, it creates a database on its own. we can also enable this using powershell commands. By doing this, we can provide our own name for the DB.

Below is the step by step commands to be executed to enable Search service using powershell.
 #Add-PSSnapin Microsoft.SharePoint.PowerShell  
 # 1.Setting up some initial variables.  
 write-host 1.Setting up some initial variables.  
 $SSAName = "InternalSearch"  
 $SSADatabase = "InternalSearchDB"  
 $saAppPoolName = "SecurityTokenServiceApplicationPool"  
 $SSI = get-spenterprisesearchserviceinstance -local  
 $err = $null  
 # Start Services search services for SSI  
 write-host Start Services search services for SSI  
 Start-SPEnterpriseSearchServiceInstance -Identity $SSI  
 Start-SPEnterpriseSearchQueryAndSiteSettingsServiceInstance $SSI  
 # 2.connect to an Application Pool.  
 write-host 2.connect to an Application Pool.  
 $AppPool = Get-SPServiceApplicationPool $saAppPoolName  
 # 3.Create the SearchApplication and set it to a variable  
 write-host 3.Create the SearchApplication and set it to a variable  
 $SearchApp = New-SPEnterpriseSearchServiceApplication -Name $SSAName -applicationpool $AppPool -databasename $SSADatabase  
 #4 Create search service application proxy  
 write-host 4 Create search service application proxy  
 $SSAProxy = new-spenterprisesearchserviceapplicationproxy -name $SSAName" ApplicationProxy" -Uri $SearchApp.Uri.AbsoluteURI  
 # 5.Provision Search Admin Component.  
 write-host 5.Provision Search Admin Component.  
 set-SPenterprisesearchadministrationcomponent -searchapplication $SearchApp -searchserviceinstance $SSI  
 # 6.Create a new Crawl Topology.  
 write-host 6.Create a new Crawl Topology.  
 $CrawlTopo = $SearchApp | New-SPEnterpriseSearchCrawlTopology  
 # 7.Create a new Crawl Store.  
 write-host 7.Create a new Crawl Store.  
 $CrawlStore = $SearchApp | Get-SPEnterpriseSearchCrawlDatabase  
 # 8.Create a new Crawl Component.  
 write-host 8.Create a new Crawl Component.  
 New-SPEnterpriseSearchCrawlComponent -CrawlTopology $CrawlTopo -CrawlDatabase $CrawlStore -SearchServiceInstance $SSI  
 # 9.Activate the Crawl Topology.  
 write-host 9.Activate the Crawl Topology.  
 do  
 {  
   $err = $null  
   $CrawlTopo | Set-SPEnterpriseSearchCrawlTopology -Active -ErrorVariable err  
   if ($CrawlTopo.State -eq "Active")  
   {  
     $err = $null  
   }  
   Start-Sleep -Seconds 10  
 }  
 until ($err -eq $null)  
 # 10.Create a new Query Topology.  
 write-host 10.Create a new Query Topology.  
 $QueryTopo = $SearchApp | New-SPenterpriseSEarchQueryTopology -partitions 1  
 # 11.Create a variable for the Query Partition  
 write-host 11.Create a variable for the Query Partition  
 $Partition1 = ($QueryTopo | Get-SPEnterpriseSearchIndexPartition)  
 # 12.Create a Query Component.  
 write-host 12.Create a Query Component.  
 New-SPEnterpriseSearchQueryComponent -indexpartition $Partition1 -QueryTopology $QueryTopo -SearchServiceInstance $SSI  
 # 13.Create a variable for the Property Store DB.  
 write-host 13.Create a variable for the Property Store DB.  
 $PropDB = $SearchApp | Get-SPEnterpriseSearchPropertyDatabase  
 # 14.Set the Query Partition to use the Property Store DB.  
 write-host 14.Set the Query Partition to use the Property Store DB.  
 $Partition1 | Set-SPEnterpriseSearchIndexPartition -PropertyDatabase $PropDB  
 # 15.Activate the Query Topology.  
 write-host 15.Activate the Query Topology.  
 do  
 {  
   $err = $null  
   $QueryTopo | Set-SPEnterpriseSearchQueryTopology -Active -ErrorVariable err -ErrorAction SilentlyContinue  
   Start-Sleep -Seconds 10  
   if ($QueryTopo.State -eq "Active")  
     {  
       $err = $null  
     }  
 }  
 until ($err -eq $null)  
 Write-host "Your search application $SSAName is now ready"  

Sunday, February 12, 2017

Migrate Sharepoint User Account to a New Login Name

There might be many occasions where we have to change the Users' account, could be the domain change or name change.

 Also another scenario is, if we have enabled Farm based authentication sharepoint adds some special characters to the account in the start like 'i:0#.w|' and if  we disabled it at later point, these names will not be changed.  We need to migrate / change the account names manually before people start using it. If not, we see 2 accounts for individual users.

we can achieve this functionality using Poweshell script. Considering above scenario, below is the script used to migrate resources in bulk when we are moving back form Farm based to windows authentication.

Below script is to get all the people present in the current system to a CSV File.
 function GetSPWebUsers($SiteCollectionURL)   
 {   
   [System.Reflection.Assembly]::LoadWithPartialName("Microsoft.SharePoint") > $null   
   $site = new-object Microsoft.SharePoint.SPSite($SiteCollectionURL)   
   $web = $site.openweb()   
   $siteUsers = $web.SiteUsers   
 @(foreach ($user in $siteUsers) {  
   $usergroup = New-Object System.Object  
      $usergroup | Add-Member -type NoteProperty -name AccountName -value $user.LoginName  
    Write-Output $usergroup   
 }) | Export-Csv c:\userlist.csv -NoTypeInformation   
   $web.Dispose()   
   $site.Dispose()   
 }   
 GetSPWebUsers $args[0]  
 #to execute, run the command as below  
 #GetSPWebUsers "http://<<site collection URL>>"  

By running above script, we get all the users' login names to a CSV file which will be used as an input of below code where we migrate individual users to the windows accounts which are formed by removing the starting set of special characters "i:0#.w|"
 Add-PSSnapin Microsoft.SharePoint.PowerShell  
 function MigrateUserOrGroups($csvFile)  
 {  
   #Getting the SPFarm object  
   $farm = Get-SPFarm  
   Import-Csv $csvFile | ForEach-Object{  
   Write-Host "Migrating User" $_.login "to" $_.login.Substring(7) -ForegroundColor Green  
   $farm.MigrateUserAccount( $_.login, $_.login.Substring(7), $false )  
   Write-Host "Migration Completed" -ForegroundColor Cyan  
   }  
   # $farm.Name  
 }  
 MigrateUserOrGroups $args[0]  
 #to execute, run the command as below  
 #MigrateUserOrGroups "c:\userlist.csv"  

You can modify the code as per your requirement.

Sunday, January 22, 2017

Update List Items without modifing System columns in Sharepoint

Its most common we need to update few column values in backed without changing system columns like Modified By, Modified On in a Sharepoint list / document library.

In order to achieve this, we need to go with Item.SystemUpdate() instead of Item.Update() in your C# code.

In case, if its a one time activity and we need to update data in bulk, the easiest way is to go with PowerShell script. Below is the example to update a column value in a list without changing Modified On and Modified By values, using PowerShell.

 Add-PSSnapin microsoft.sharepoint.powershell  
 $web = Get-SPWeb "<<Site URL>>"  
 $list = $web.lists["<<List Name>>"]  
 #Get all items in particular list and save them to a variable.   
 #Here you can also apply your CAML query to fetch particular set of records  
 $items = $list.items  
 #Go through all list items  
 foreach($item in $items)  
 {       
      #If any conditions are required, can set them here in if clause.  
      #Update the fields as below.  
      $item["<<Field Display Name>>"] = "<<Value>>";  
      #This is the important change, using systemupdate will just set the above fields.  
      #This will not update Modified & Modified By Fields.  
      $item.SystemUpdate();  
 }  
 $web.Dispose();  

Friday, November 25, 2016

Sharepoint 2013 Change Sharepoint Branding text in Top Left

In Sharepoint instance, we see a branding text 'SharePoint' on top left corner of the page.

There are multiple ways to change this text to our organization branding. Few of the easy approaches are as below.

Approach 1: Using Powershell.
In Powershell, we have a property SuiteBarBrandingElementHtml for webapplication using which we can read and set the Branding Element HTML. Use below code to read and set the text.
 #Add powershell snapin  
 Add-PSSnapin microsoft.sharepoint.powershell  
 #Get web application  
 $webApp = Get-SPWebApplication http://metisqa.broadridge.net/  
 write-host "Original Branding Text"  
 #read brand elemnt html  
 write-host $webApp.SuiteBarBrandingElementHtml  
 #Set Branding Element HTML. can include styles / class file as below   
 $webApp.SuiteBarBrandingElementHtml = "<div class='ms-core-brandingText'>Your Company Name</div>"  
 #Update the webapplication to reflect above changes  
 $webApp.Update()  
 write-host "Updated Branding Text"  
 #read existing brand elemnt html  
 write-host $webApp.SuiteBarBrandingElementHtml  

We can also set Images / hyper links in the branding text by simply setting the required HTML tagged text.

Approach 2: Using CSS
As the Branding text tag holds as CSS Class 'ms-core-brandingText', we can update styles around this class and change display  using 'Content' style attribute.
 .ms-core-brandingText:after  
 {   
      content:"Your company Name";  
      padding-left:10px;  
 }  
 .ms-core-brandingText{  
      margin-left: -95px;  
 }  

In this approach we can set images using css property background-image, but can't set any links to the branding element.

Approach 3: JavaScript / JQuery
Update html text in the html branding text tag. this can be achieved easily using the CSS class 'ms-core-brandingText'
 //Jquery code to set branding text  
 $('.ms-core-brandingText').html('Company Name');  
Here, we can also set image / hyper links by setting required html content in above code.

By using any of the above approached, it appears as below.


Friday, February 20, 2015

Create a List from Custom Template using Powershell in Sharepoint

Lets consider a situation where we have lots of team sites under a Site collection. Now a new requirement has come and we want to store Team Updates in their corresponding sites.

To do this, creating the custom list with required fields in every list is a long time process. If we create a list in one site and save it as template, we can create New list using this template in other sites. Still manually opening all sites and creating a new list will take long time.

This creation part can be achieved using Powershell. For this, lets assume we created a list and saved it as template. This template will be available in site collection. We can also import List template to Site Collection gallery from external.

Now, open the server and use below Powershell commands in Sharepoint Management Studio

 //Get Site collection through SPSite command  
 $spSite = get-spsite("http://Site Collection URL")  

 //Get current website into which new template to be added  
 $SPWeb = Get-SPWeb("http://Site URL") 
 
 //Get list of all custom templates existing in the site collection  
 $listTemplates = $spsite.GetCustomListTemplates($spweb)  

 //Create list using the above templates, by selecting the custom template you are looking for  
 $SPWeb.Lists.Add("Title of List","Description",$listTemplates["Template Name"])
  

Above example is shown for a single site. We can loop the command for list of sites by storing them into an array or if for all subsites, we can fetch them through command and loop.

As our List template is custom one, we need to follow above steps. If we want to create list from sharepoint's default templates, we can use below commands

 //Get current website into which new template to be added  
 $SPWeb = Get-SPSite("http://SiteURL")  

 //Get list of all templates. Its just for your reference to see list  
 $SPWeb.ListTemplates | Select Name, type, type_client, Description  

 //Create list using the template name. The template name should be in above list  
 $SPWeb.Lists.Add("Title","Description","Template Name")  


You can also save an existing list as a template using below commands

 //Get current website in which the list is created  
 $SPWeb = Get-SPSite("http://SiteURL")  

 //Get the list by using list name which to be saved as template  
 $list = $web.Lists["List Name"]  

 //Use below command to save it as template.   
 //Lat parameter ( 1 / 0 ) indicates if to be stored with data or without data  
 $list.SaveAsTemplate(“Template Name”,”Template Title”,”Template Description”,1)