Showing posts with label sharepoint online. Show all posts

Wednesday, April 7, 2021

PowerApps - Append Text Enabled field Functionality on Sharepoint

In Sharepoint,  we do have "Append Changes to Existing Text" functionality on Mutli text fields. We use this for common requirements like, comments, Audit history logs of the list item / document in a library.  

If we use PowerApps to customize the default form, sad part is, PowerApps doesn't have the capability to display history content of the field. 

Below is the User voice on it and its under review by Microsoft Team.

https://powerusers.microsoft.com/t5/Power-Apps-Ideas/Append-comments-Field/idi-p/35306

We have couple of alternate solutions for this functionality, a few as below,

  1. Separate list to store comments and display them in powerapps form by querying them related to the list item
  2. Use Flow to query comments from list history and display the response content on PowerApps form
  3. Maintain another field in the list to store history of the field content changes and display it on the form.

If the list / process is a new one, I would suggest to go with Approach 3 for now, as its easier to configure and also once the functionality available, we can remove this field from list and form.

Below are the steps to implement it.

Step 1. Create the Multiline text field “Comments” with Plain text enabled, and enable “Append Changes to existing text”, (this is not needed now, but in future, once Powerapps brings the functionality, we can make use of it)


Step 2: Create another Multiline text field, “Comments_History” with rich text enabled.


Step 3: Add comments field in PowerApps form and set visible property to Not(SharePointForm1.Mode = FormMode.View) (Hide this field on view form, as content would be in history field)


Step 4: Add Comments History Field in form and

               4.a: Remove the text field inside data card

               4.b: Insert “HTML Text” from the ribbon and set HTMLText property to Parent.Default


               4.c: we would see 2 errors, one is Update property, clear the formula of it

               4.d: Other error is Y property of card, in formula, replace DatacardX with HtmlText1 I, it would resolve

               4.e: Also, for Visible property of data card, set Not(IsBlank(ThisItem.Comments_History)) (We hide this field, when no content in it)


Step 5: Publish the form


Now, we need to have logic to save content from Comments field to the History field. 

Here we can use Patch method from PowerApps or, if we have a Flow functionality on the list, we can write logic in it.  Here, I used Flow, as in below 


Step 6: Now, create a new flow / open existing flow associated to this list, it should trigger on New and Update


Step 7: Add logic to check if comments field is empty or not and if not, build HTML content for Comments history by appending to existing content in History field and update current item


Finally, upon adding item, in the form, it would appear as in below.


Wednesday, July 8, 2020

Microsoft Flow - Avoid Infinite Loop on Sharepoint Lists

In Flow triggers on a Sharepoint list, we have either to trigger on Create or Create and Modify. When we use triggers on Modify and if the flow logic has functionality to Update Current Item, then upon running this action, it triggers the flow again and thus leads to infinite internal loop.

The reason is all update actions, could be our own HTTP Rest API or the Update Item action, both would go though standard process and these updates would trigger any flows configured to run on modify. 

Till Microsoft  comes up with different actions to update, we can leverage Trigger Conditions, available in Trigger Settings.

Trigger conditions are basically, extra conditions we can configure to make sure the flow executes only if they are met. Like, run only if Status is Complete. 

And, to avoid this infinite looping, I follow below 2 approaches, based on the situation.

Approach 1: If we are using any System Account for all the connections, this would say any updates happened through a Flow would set the Modified By to the System Account. So, in this case, I use the trigger condition as to run only if the Modified by is no the System Account. 

In this way, even if the record is updated through different flow, no flow would be triggered. 

And the trigger condition is
                    @not(contains(triggerBody()['Editor']?['Claims'],'adminaccount@company.com'))

Here I used Claims property. we can use any other property like Display Name, email etc.


Approach 2: If we are not using dedicated Accounts, then we create a new DateTime column named FlowRunDate. And, in every update action, we make sure to set this column value to UtcNow().

Thus, if any update happened through flow, we would have FlowRunDate and Modified as same values. 
If its updated manually, Modified date changes, but not FlowRunDate. 

We use this condition to control the flow execution. And, the conditions is,

@or(
          empty(triggerBody()?['FlowRunDate']),
          greaterOrEquals(
                    ticks(triggerBody()?['Modified']),
                    ticks(addSeconds(triggerBody()?['FlowRunDate'],10))
              )
       )

Here the first condition to check if the field value is empty, i.e. for already existing records, it will be helpful. And, the section condition is we add 10 seconds to the FlowRunDate field value and compare with Modified field. If the difference is more than it, then the update is happened by external person ad thus trigger the flow.

We can have 5 seconds or soem other value, but some time is needed as there are chances that there could some fraction of seconds difference from Modified Date field from other fields in update event.


Thursday, June 4, 2020

Microsoft Flow - Setup Sharepoint Groups and Users

In this article we would go through Creation of a Sharepoint Group, providing access to it and then adding a set of users to it through the Microsoft Flow using Sharepoint Rest APIs.

Creation of a Group:
Rest API to create a group is 

Uri: /_api/Web/SiteGroups
Method: POST
Header: {content-type:'application/json; odata=verbose'}
Body:{
               "__metadata": {
                        "type": "SP.Group"
               },
               "Title": "Demo Group - Contribute",
               "Description": "Created through API in Flows."
           }

We refer the above API call in Flow action: Send an HTTP Request to Sharepoint as in  below


Set Permissions to Sharepoint Group:
Rest API to set Permissions for a group / user is 

Uri: /_api/web/roleassignments/addroleassignment(principalid=<<PrincipalID>>, roledefid=<<PermisisonRoleID>>)
Method: POST

Here, PrincipalID is the ID of group created in above action. we can fetch this in Flow as body('HTTP_-_Create_Group')?['d']?['Id']
And, RoleDefID is the ID of permission role we are looking to assign. In sharepoint, each permisison role has an internal ID. We can find them by accessing Rest API /_api/web/roledefinitions
Here, for Contribute, the RoleID is 1073741827


Add Users to a Sharepoint Group
Rest API to add users to a Sharepoint group is

Uri:/_api/web/sitegroups/GetById(<<GroupID>>)/users
Method: POST
Header: {content-type:'application/json; odata=verbose'}
Body: {
                  "__metadata": {
                          "type": "SP.User"
                  },
                  "LoginName": "<<LoginName of User>>"
            }

We already have GroupID from the first action and for user, we need Login Name of it. 


Once we execute it, it creates a group and adds user as in below


If we have multiple user accounts, we can add them to an array and use loop action for this API. Or, use BULK API to merge all calls except the first one as we need GroupID for other service calls. For Bulk API, I have provided demo in my previous post Set Permissions on a Sharepoint list Item

Thursday, May 21, 2020

Microsoft Flows - Send an Email - SPUtility

Before we go into how to implement it, we shall quickly look into the advantages and disadvantages of using this approach to send emails In Flows for Sharepoint.

Advantages:
  • Using this approach we can avoid the complex configuration to send  Email to Sharepoint Group 
  • we can set any Sharepoint user in From Address, i.e. the Email can be addressed from any existing Sharepoint User. This will be helpful to send emails on behalf of Managers etc.
  • Can send HTML formatted email content. This helps us to design custom templates
Disadvantages:
  • Cannot attach files in the email
  • Can't send emails to external emails or mail boxes, i.e. the emails that doesn't have user accounts
  • From Address cannot be configured to any Mailbox or random name
Implementation:

we use SPUtility SendEMail Rest API method to send an email using HTTP Request to Sharepoint Action

As the SPUtility send email is a sharepoint related method, it only accepts Sharepoint entities to send emails and also if we provide a Sharepoint Group name, it would resolve it internally and sends emails to group members.

Below is sample screenshot and the JSON input we used to send email.

This email goes to Sharepoint Group "Demo Sharepoint Group", CCing Sharepoint group "CC Sharepoint Group" along with user "John". And this email is sent on behalf of "Riyana"
Also, we provided an external email id in TO list, but it doesn't send. 


Body:
 {  
       'properties': {  
         '__metadata': {  
           'type': 'SP.Utilities.EmailProperties'  
         },  
         'From': 'riyana@tmsdemo.onmicrosoft.com',  
         'To': {  
           'results': ['Demo Sharepoint Group','nonuseremail@external.com']  
         },  
         'CC': {  
           'results': ['CC Sharepoint Group','john@tmsdemo.onmicrosoft.com']  
         },  
         'Body': '<p>Demo EMail, <br/><br/>Sample email through Flows.</p>',  
         'Subject': 'Sample email through SPUtility'  
       }  
     }  

And the email in Outlook is

Thursday, April 30, 2020

Microsoft Flows Handle XML Data

Similar to JSON Parser, there is no direct available actions to handle XML Data in Flows. But we do have 2 functions that can be used in expressions, xpath() and xml(). we will be going through these functions as below.

XML function will take JSON object data or any XML formatted string and converts it into an XML object. And, if we use JSON object, make sure there is a root property (only one) and not an array object.

 xml(json('{"EmployeeName":"Lucky"}'))  
Returns  
 <EmployeeName>Lucky</EmployeeName> 
 
 xml(json('{"Records":{"Employee":[{"Name":"Lucky","Id":"12345"},
                                   {"Name":"Raga","Id":"54321"}]}}'))  
Returns  
 <Records>
  <Employee>
    <Name>Lucky</Name>
    <Id>12345</Id>
 </Employee>
 <Employee>
    <Name>Raga</Name>
    <Id>54321</Id>
 </Employee>
</Records>  

xml('<Employee>Lucky</Employee>')
Returns
<Employee>
   Lucky
</Employee>

 xml(json('{"Name":"Lucky","Id":"12345"}'))  
 This fails as there are 2 parent properties  

XPATH function is used to navigate through XML and fetch the node content. This function has 2 inputs, first one is the XML object and second one is XPATH expression. And, returns array or XML nodes or the values in nodes as per given XPATH

Lets consider below sample XML

 <?xml version="1.0" encoding="utf-8" ?>  
 <Records>  
      <Employee>  
           <Id>1234</Id>  
           <Name>John, Velvet</Name>  
           <Role>Senior Developer</Role>  
           <Salary>15000</Salary>  
      </Employee>  
      <Employee>  
           <Id>3424</Id>  
           <Name>Angel, Josh</Name>  
           <Role>Developer</Role>  
           <Salary>12000</Salary>  
      </Employee>  
      <Employee>  
           <Id>5421</Id>  
           <Name>Tim, Kary</Name>  
           <Role>Tech Lead</Role>  
           <Salary>18000</Salary>  
      </Employee>  
 </Records>  


We can refer to below XPATH expressions to pull data

 xpath(xml(outputs('xmlContent')),'/Records/Employee')  
 Returns array of EMployee Nodes with XML data in them.  
 [  
      '<Employee>  
           <Id>1234</Id>  
           <Name>John, Velvet</Name>  
           <Role>Senior Developer</Role>  
           <Salary>15000</Salary>  
      </Employee>'  
      ,  
      '<Employee>  
           <Id>3424</Id>  
           <Name>Angel, Josh</Name>  
           <Role>Developer</Role>  
           <Salary>12000</Salary>  
      </Employee>'  
      ,  
      '<Employee>  
           <Id>5421</Id>  
           <Name>Tim, Kary</Name>  
           <Role>Tech Lead</Role>  
           <Salary>18000</Salary>  
      </Employee>'  
 ]  

 xpath(xml(outputs('xmlContent')),'//Name')  
 Returns, array of values of all Nodes with "Name",  
 ['<Name>John, Velvet</Name>','<Name>Angel, Josh</Name>','<Name>Tim, Kary</Name>'] 
 
 xpath(xml(outputs('xmlContent')),'/Records/Employee/Name')  
 Returns, array of Names under Employee/Records nodes  
 ['<Name>John, Velvet</Name>','<Name>Angel, Josh</Name>','<Name>Tim, Kary</Name>']  

 xpath(xml(outputs('xmlContent')),'sum(/Records/Employee/Salary)')  
 Returns, sums up the values from the xpath node values.  
 45000  

 xpath(xml('<employee>Lucky</employee>'),'string(.)')  
 Returns, value in the Node.  
 Lucky  

As we get the response in Array, we can use Apply to Each or Join Operations to go through the content.

Note: When we directly look into the action ouputs in flow history, it would be in encoded format. Once you access into any actions, it will be decoded. 

Thanks to Raga for looking into this along with me. 

Wednesday, April 8, 2020

Microsoft Flows: Send an email to Sharepoint Group

Microsoft Flows doesn't have direct access to Sharepoint Groups. So, we need to use Rest API to fetch group members from a sharepoint group. Also, to send an email, we need Email IDs, thus we extract email ids of all group members from the Rest Response and use them in Email Notification.

Below are the step by step procedure to achieve it .


  1. Use Send an HTTP Request to Sharepoint action to call below Rest API to fetch group members
    /_api/web/sitegroups/getbyname('<<GroupName>>')/users?$select=email&$filter=PrincipalType%20eq%201

    Here we are selecting only email as we don't need other information. Also, we filtered for PrincipalType to 1 so that we want only Users from the Group. If we want other types, we can update the filter. 

  2. As the response from HTTP request is in JSON (default), we need to use Parse JSON action to parse the response. 


    The content for this action is output of HTTP call and for Schema, we can click on Generate from Sample and  paste the RAW response from HTTP action to it.

  3. Now we have the response with List of Users in Object Collection, we need to extract EMails from it.  We can use Apply to Each action, but we will go with better performance actions - Select and Join as discussed in earlier post

    Select action is to Extract only Emails for the Object collection and convert to simply array of Emails.
    Join action is to join the Emails in array with semi-column delimiter

  4. Now we have all the Email ids in output of Join action and we can use it in Email Notification.

Happy coding :-)

Thursday, April 2, 2020

Set Permissions on a Sharepoint list Item using Microsoft Flows

There are no actions yet available to set permissions on a Sharepoint List Item. we need to use Rest APIs through Send an HTTP Request to SharePoint action. In this article, we shall go through all the Rest APIs we are going to use for permissions.

  • First, we need to break inheritance of the Item / Sharepoint object, below is the Post call
    breakroleinheritance(copyRoleAssignments=true, clearSubscopes=true)
    • CopyRoleAssignments: this will maintain existing permissions. If set to false, clears existing assignments / permissions
    • clearSubscopes: this is used for items / objects below current object, i.e., if we are breaking permissions on List, this property controls for list items.
  • Next, we need to assign roles, this could to be a user / group.  below is the post call.
    /roleassignments/addroleassignment(principalid=,roleDefId=)
    • Principalid: It is the ID of User / SP Group we are going to assign. We can get IDs of user using service /_api/web /siteusers and for group, /_api/web/sitegroups

    • roleDefId: Its is the ID of Permission Role we want to assign to. We can get Role IDs, using the service /_api/web/roledefinitions


We can do only one role assignment to one user / group at a time. As there would be multiple Rest API calls, we use Batch Requests to achieve this in single call.

The syntax to batch call is as below,
  --BatchID   
  content-type: multipart/mixed; boundary=ChangesetID   
  Host:    
  Content-Transfer-Encoding: binary  
  --ChangesetID   
  content-type: application/http   
  Content-Transfer-Encoding: binary   
  <<service call>> HTTP/1.1   
  --ChangesetID   
  content-type: application/http   
  Content-Transfer-Encoding: binary   
  <<service call>> HTTP/1.1   
  --ChangesetID--   
  --BatchID--   

Using above format, we can merge all the role assignments to one batch call by using Send an HTTP request to Sharepoint.

Here,  create 2 GUIDs to use for Batch and Changeset, expression is guid()

then, use HTTP request action as in below image


Tuesday, March 31, 2020

Handling Multi Select Field Values in Microsoft Flows

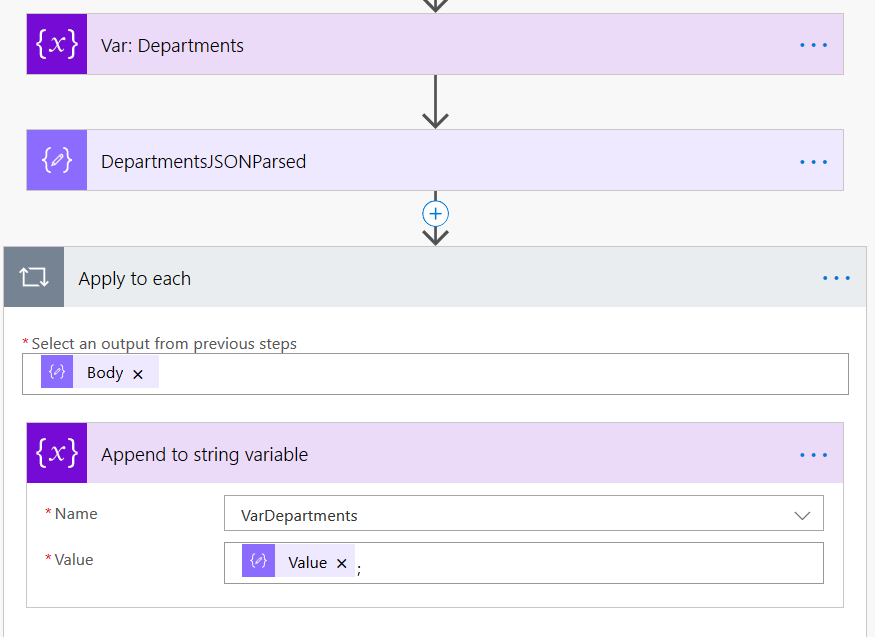
It's tricky to use Multi Select fields, could be a Choice field / People Picker. It's because the values returned in these field types are JSON Object Arrays, thus if we try to use field directly in an email action or other, it would auto add Apply to Each and extracts individual item as in below image.


And the Sample JSON is as below.
 [  
  {  
   "@odata.type": "#Microsoft.Azure.Connectors.SharePoint.SPListExpandedReference",  
   "Id": 1,  
   "Value": "Agriculture"  
  },  
  {  
   "@odata.type": "#Microsoft.Azure.Connectors.SharePoint.SPListExpandedReference",  
   "Id": 3,  
   "Value": "Political"  
  },  
  {  
   "@odata.type": "#Microsoft.Azure.Connectors.SharePoint.SPListExpandedReference",  
   "Id": 5,  
   "Value": "Engineering"  
  }  
 ]  

In order to use the values, we first need to extract Values from above JSON and join the values.
There are couple of ways to implement it as below

Approach 1:
  • Initialize Variable of type String to hold the value
  • Use Parse JSON Action to parse the JSON object data, i.e. the multi choice field
  • Use Apply to Each to go through the Parsed JSON response
  • Inside Loop action, add Append to String action and set the Value property of Parsed Object to created variable
  • Now the variable will have selected values with semi-column separated and can be used in any action as a string.

If we don't want to use Parse JSON action, we can directly refer the Multi Choice field in Apply to Each. By doing so, we won't be able to select the Value property from JSON object, but can use simple expression to fetch it, item()?['Value']


Approach 2: (Suggested.)

  • Use Select action to select Value property from the JSON object array, here we use expression item()?['Value']
  • Use Join Action with semi column separator to join the values from above action


Second approach executes much quicker compared to other as we don't use Loop action here.


And, if the field is People Picker, the JSON data sample is as below and instead of 'Value' property in above expressions, we can choose Email / DisplayName as per requirement.
 [  
  {  
   "@odata.type": "#Microsoft.Azure.Connectors.SharePoint.SPListExpandedUser",  
   "Claims": "i:0#.f|membership|demo1@sptest.onmicrosoft.com",  
   "DisplayName": "LaxmiNarayana Ruttala",  
   "Email": "demo1@sptest.onmicrosoft.com",  
   "Picture": "https://sptest.sharepoint.com/_layouts/15/UserPhoto.aspx?Size=L&AccountName=demo1@sptest.onmicrosoft.com",  
   "Department": null,  
   "JobTitle": null  
  },  
  {  
   "@odata.type": "#Microsoft.Azure.Connectors.SharePoint.SPListExpandedUser",  
   "Claims": "i:0#.f|membership|demo2@sptest.onmicrosoft.com",  
   "DisplayName": "Demo User",  
   "Email": "demo2@sptest.onmicrosoft.com",  
   "Picture": "https://sptest.sharepoint.com/_layouts/15/UserPhoto.aspx?Size=L&AccountName=demo2@sptest.onmicrosoft.com",  
   "Department": null,  
   "JobTitle": null  
  }  
 ]