Monday, February 23, 2015

Display Images based on field value in Salesforce

It's very common requirement to display images for a specific field value in a record, as pictorial representation will be more conveying than text.

For example, to display Status of a record pictorially, lets have some rule as
  • If status Open - display Green image
  • If status Planning - display Amber image
  • If status Closed - display Red image

To implement this requirement in Salesforce, we have to store images in Salesforce , either in Documents or Static Resources and then, using Formula Field in the object, by comparing data of the actual field, we will set Image  relative path of the stored images

Lets do step by step as shown as below

Step 1 : Create images with the 3 colors as required and zip them.


Step 2: Add this zip file to the static resources and set the access of it as public
To do this , follow below steps
  1.  Login to salesforce environment and Go to Setup
  2. Under Build, select 'Develop' and then 'Static Resources
  3. Click on New and fill in the required information by uploading the Zipped file
  4. select Cache Control 'Public' and save


Step 3: Open the Object in which we need to set the images and create a Choice field to select Status and then a new Formula field to set image according to the data of the created Choice Field
To do this, follow below steps
  1. Go to Setup
  2. Under Build, Select 'Create' and then 'Objects'
  3. List of all objects displayed. Click the object in which we need to create these fields
  4. Go to Custom Fields section and click 'New'
  5. Choose 'Picklist' for Data type and provide required information as below

  6. Save it and then in similar way click on 'New' in Custom Fields section and for Data type, choose 'Formula'
  7. Provide Field name and label, then select Return type as 'Text'
  8. Now, under 'Advanced Formula' section, write formula as below
     IMAGE(CASE( Status__c ,  
     'Open', '/resource/status/green.png',  
     'Closed', '/resource/status/red.png',  
     'Planning', '/resource/status/yellow.png',  
     ''), "rating")  
    

  9. And, for Blank Field Handling, select Treat blank fields as blanks'
  10. Provide the required access and also add it into the layouts

Step 4: Now, add this formula field in detail screen layout and also View if required.
Once you add it into the layout, you can see the same in detailed screen of a record. Also, if you add these fields in a View, it will be displayed as in below image


Friday, February 20, 2015

Create a List from Custom Template using Powershell in Sharepoint

Lets consider a situation where we have lots of team sites under a Site collection. Now a new requirement has come and we want to store Team Updates in their corresponding sites.

To do this, creating the custom list with required fields in every list is a long time process. If we create a list in one site and save it as template, we can create New list using this template in other sites. Still manually opening all sites and creating a new list will take long time.

This creation part can be achieved using Powershell. For this, lets assume we created a list and saved it as template. This template will be available in site collection. We can also import List template to Site Collection gallery from external.

Now, open the server and use below Powershell commands in Sharepoint Management Studio

 //Get Site collection through SPSite command  
 $spSite = get-spsite("http://Site Collection URL")  

 //Get current website into which new template to be added  
 $SPWeb = Get-SPWeb("http://Site URL") 
 
 //Get list of all custom templates existing in the site collection  
 $listTemplates = $spsite.GetCustomListTemplates($spweb)  

 //Create list using the above templates, by selecting the custom template you are looking for  
 $SPWeb.Lists.Add("Title of List","Description",$listTemplates["Template Name"])
  

Above example is shown for a single site. We can loop the command for list of sites by storing them into an array or if for all subsites, we can fetch them through command and loop.

As our List template is custom one, we need to follow above steps. If we want to create list from sharepoint's default templates, we can use below commands

 //Get current website into which new template to be added  
 $SPWeb = Get-SPSite("http://SiteURL")  

 //Get list of all templates. Its just for your reference to see list  
 $SPWeb.ListTemplates | Select Name, type, type_client, Description  

 //Create list using the template name. The template name should be in above list  
 $SPWeb.Lists.Add("Title","Description","Template Name")  


You can also save an existing list as a template using below commands

 //Get current website in which the list is created  
 $SPWeb = Get-SPSite("http://SiteURL")  

 //Get the list by using list name which to be saved as template  
 $list = $web.Lists["List Name"]  

 //Use below command to save it as template.   
 //Lat parameter ( 1 / 0 ) indicates if to be stored with data or without data  
 $list.SaveAsTemplate(“Template Name”,”Template Title”,”Template Description”,1)  


Wednesday, February 18, 2015

Calculated Column & Caclulated value in Sharepoint 2010

We have Calculated columns in Sharepoint. The data in these columns can be set based on other column Information. These columns will not be displayed in New / Edit forms as the data in these columns and are calculated internally according to the formula provided by us, before saving the record in database.

You can see simple example in below image, where we are fetching Request Created Day based on created date field.


Use this link to know more about the formulas for calculated columns.

One important point to remember about these columns is, The calculation of the value is done only when an Item created and updated. So, we can't use general functions like 'Today' , 'Me' in the formula.

We can also set Calculated value for Default value to a column. If there are any requirements where default value is to be calculated, we use this.

As an example, if we want to set default value for a title in Status list with Date in it as "Status as on [Date]", we can use below formula in Default value by selecting 'Calculated Value'

 ="Status as on "&TEXT(Today,"dd/mm/yyyy")


Important point to remember here is, We can't use other columns in these formulas as these are calculated before the Edit / New screen loaded and by then we don't have data in other columns.

We can use generic formula like 'Today' or 'Me' and the value set with corresponding data when the screen loaded.

Monday, February 16, 2015

Restrict Record level Access in Salesforce

There are different approaches available to restrict access at different levels in Salesforce.

In this article we look into options available to restrict record level access in a object.

To restrict access at a record level, first we need to configure Organization-Wide Default (OWD) sharing of the object to 'Private'. This configuration once set, all the records will be private. Other users can't access them. Now, we open access using variety of means, like roles, groups, profiles ,sharing rules and manual sharing.

To configure OWD sharing, follow below steps.
  1. From Setup, click Security Controls > Sharing Settings.
  2. Under Organization Wide-Defaults, click Edit.
  3. Change the picklist next to the 'Custom object' to Private.
  4. Click Save

The check box is 'Grant Access Hierarchy'. If checked, access to a record will be provided to the Owner's top level hierarchy as per roles defined in the Organization.

Let us assume we already have some Roles and Profiles created as per our Org structure.

Now, to assign access to the records, we use 'Sharing Rules'. These are rules we define to provide access to record based on some criteria of data / owner.

We can provide access to a  Role. In some cases, we might need to provide access to multiple people of different Roles and Profiles. In such cases, we can create a User groups and provide access to the group through these rules.

To create a Sharing Rule, follow below steps,

  1. From Setup, click Security Controls > Sharing Settings.
  2. Under 'Custom Object' Sharing Rules, click New.
  3. In the Label field, Rule Nmae, provide relevant name.
  4. For Rule Type, select Based on Criteria.
  5. In Criteria, choose the criteria you are looking for, as a sample selecting the following values:
    • For Field, choose City.
    • For Operator, choose equal to.
    • For the Value type, enter 'Hyderabad'.
  6. For Share With, we have different options i.e. Roles / Groups. Choose Roles and Subordinates and select Warehouse Manager from the picklist.
  7. For Access Level, choose Read/Write.
 Once the rule is saved, a job will be executed to run the rule on the object we created. So, each time you update the rule, it is executed.

Internally, for every object we have 'object__Share' table with corresponding apex modal object. When a Sharing rule is executed, if the criteria is met on a record, corresponding access entries are entered into this table.

Irrespective of rules / criteria if we want to provide access on a record, we can provide through Manual sharing,  by using default 'Sharing' option available on detailed screen


To implement Manual Sharing, follow below steps
  1. Click on the record for which we want to add i.e. open detailed screen
  2. Click on 'Sharing' button available along with other default action buttons
  3. A list with available accesses for the record are displayed. click on 'Add'
  4. A screen to choose User / Role / Group is displayed. 
  5. Select the corresponding people / group to whom we need to provide access and click on Save

In this way we  can restrict access to a Record.

If we need to provide access to a record dynamically based  on a criteria where value and access mappings are dynamic, we can implement the above 'Manual Sharing' option using Apex.

We can create a Custom object to map criteria and corresponding access details. Now, using a trigger on our Object, upon insert or update, we validate the criteria and if true, add record to the 'Object__Share' table through Apex with corresponding details.


 if(/* Condition to validate */)  
       {  
         //If true,   
         TF_Location__Share jobShr = new TF_Location__Share();  
         // Set the ID of record being shared.  
         jobShr.ParentId = record.id;  
         // Set the ID of user or group being granted access.  
         jobShr.UserOrGroupId = '005j000000BYezb';  
         // Set the access level.  
         jobShr.AccessLevel = 'Read';  
         // Set rowCause to 'manual' for manual sharing.  
         // This line can be omitted as 'manual' is the default value for sharing objects.  
         jobShr.RowCause = Schema.TF_Location__Share.RowCause.Manual;  
         // Insert the sharing record and capture the save result.   
         // The false parameter allows for partial processing if multiple records passed into the operation.  
        Database.SaveResult sr = Database.insert(jobShr,false);  
        // Process the save results.  
        if(sr.isSuccess()){  
            // Indicates success  
        }  
       }  


Wednesday, February 11, 2015

Custom Timer job in Sharepoint 2010 using Visual Studio

Sharepoint provided a platform to develop timer jobs and deploy in its environment. We can monitor the jobs in central admin along with other jobs. Scheduler configuration is also possible through central admin.

To manage timer jobs, acces to Central Administrator > Monitoring > Review Job definitions
And to monitor job executions, Central Administrator > Monitoring > Check Job Status


Let’s create a sample Timer job and deploy it for better understanding.

Requirement: We have project sites for each project where their health statuses etc. are maintained in predefined template lists.  Now, customers need a dashboard to look into the project status at one place along with individual sites’ links.

Approach: For this, we are creating a list with required details in parent site and we develop a Timer Job to which runs at certain interval and updates the statuses of all sites into this list and a dashboard is created using this list.

Step 1: Create ‘Project Statistics’ list in Site collection / Parent site and ‘Project Details’ in child site (Individual project sites)

Step 2: Now we need to create a Timer job. To do this, follow below steps
  1. Open Visual Studio and create a new project using  ‘Empty Sharepoint Project’ Template

  2. If Sharepoint has single Server, provide the web application where it has to be deployed and don’t forget to select ‘Deploy as a Farm Solution’ and then click on ‘Finish'

    Note: If site url is not provided, we can package it and deploy the WSP solution using Powershell.
  3. Now, create a new class file in visual studio and extend the class from ‘SPJobDefinition’. Use below code as sample reference
         public StatusUpdateTimerJob()  
           : base()  
         {  
         }  
         public StatusUpdateTimerJob(string jobName, SPService service,  
             SPServer server, SPJobLockType lockType)  
             : base(jobName, service, server, lockType)  
         {  
           this.Title = "Project Status Update Timer Job";  
         }  
         public StatusUpdateTimerJob(string jobName, SPWebApplication webapp)  
           : base(jobName, webapp, null, SPJobLockType.ContentDatabase)  
         {  
           this.Title = "Project Status Update Timer Job";  
         }  
         public override void Execute(Guid targetInstanceId)  
         {  
           //Write your logic to delete existing records from main list (Project Statistics) in parent site and then  
           //Iterate through all child sites and insert new records to above list from 'Project Details' list  
         }  
    
    Above code has 3 overloaded constructors which will be called internally as per need and write your logic in Execute method
  4. Now we create a feature to install and uninstall the Job. To do this, right click on ‘Features’ in solution explorer or Visual studio and click ‘Add Feature’

    Provide Feature Title and Description , this will be displayed in Features list of a site collection and select scope to ‘Site’


    In the event Receiver class of the above created feature, replace the code with below
     const string JobName = "ProjectStatus Update Timer Job";  
     public override void FeatureActivated(SPFeatureReceiverProperties properties)  
     {  
          SPSite site = properties.Feature.Parent as SPSite;  
          DeleteJob(site); // Delete Job if already Exists  
          CreateJob(site); // Create new Job  
     }  
     private static void DeleteJob(SPSite site)  
     {  
          foreach (SPJobDefinition job in site.WebApplication.JobDefinitions)  
               if (job.Name == JobName)  
                    job.Delete();  
     }  
     private static void CreateJob(SPSite site)  
     {  
          StatusUpdateTimerJob job = new StatusUpdateTimerJob(JobName, site.WebApplication);  
          SPMinuteSchedule schedule = new SPMinuteSchedule();  
          schedule.BeginSecond = 0;  
          schedule.EndSecond = 5;  
          schedule.Interval = 5;  
          job.Schedule = schedule;  
          job.Update();  
     }  
     public override void FeatureDeactivating(SPFeatureReceiverProperties properties)  
     {  
          DeleteJob(properties.Feature.Parent as SPSite); // Delete the Job  
     }  
    

    The above methods are to Create Job and Delete job which are called when feature activated and deactivated accordingly.
  5. Now are ready with our Timer job and we have to deploy it in the server. We can deploy it directly from Visual studio using ‘deploy’ Option in ‘debug ‘ or by packaging and installing the Solution
    To install Solution, use below Powershell commands
     Add-SPSolution -LiteralPath c:\SampleTImerjob.wsp  
     Install-SPSolution -Identity SampleTImerjob.wsp -GACDeployment  
     enable-spfeature -identity SampleTImerjob _Feature1 -url ‘Site collection URL’  
    
    We deployed it in GAC, as it’s a Timer job and should be accessed globally.

    Note: 1st 2 commands should be executed in one window and the last one should be in a new window as the dll is deployed in GAC, it will not reflect for the powershell window if we try to enable in same window
Step 3: Using above commands, we even activated the feature. So, the job will be created and it is scheduled. You can see it in ‘Central Admin’ as explained in the starting

We can also reconfigure the schedule by clicking on the title.


With this we implemented our requirement and for every 2 minutes, statuses for all project sites are updated in parent site and the dashboard is prepared on top of the list.

One important point to not to forget is, if we are modifying the Timer job, we have to update the Assembly version number. If not, the changes might not reflect properly

Thursday, January 8, 2015

Word Document Creation Dynamically in Sharepoint 2010

Though I have been working on SharePoint from past 4+ years, I didn't notice this awesome feature, We can create / update word documents dynamically in SharePoint. This is a very useful feature which will be helpful in creation of standard word documents like Approval forms / Employee Offer letters etc. It just takes few minutes to setup.

Lets try to create one sample form (Employee Offer Letter) using this feature.

I'm implementing this example in Sharepoint 2010. We need Design rights on SharePoint site and also Sharepoint Designer, MS Word  are needed for this example.

 Step 1: Create a Document library to generate and store the Offer letter documents in the  site. Create the columns that are dynamically need to be updated in the document, eg: Name, salary etc. The columns in Library acts as properties for a document, which can be added directly in the word document. In this example I added 4 such fields
      1. Employee Name
      2. Salary
      3. Designation
      4. Proposed Joining Date


 Step 2: For every Document library we will have a default file template for that library. This can be word document too. To edit it, go to Settings > Advanced Settings . Document template will be available, click on 'Edit Template'. This opens up MS Word with the standard template file (.dotx)


 Step 3: Now, writeup the standard content that to be there in the Offer letter and in the places where data to be filled dynamically i.e. Employee name, salary etc. insert the Document Properties that we created in above steps. To add a document property, Select 'Insert' in word ribbon and Go to Quick Parts > Document Properties. All the above created columns are displayed along with default ones. Select corresponding property.


Step 4: Once added , click on Save as and change the format from '.dotx' to '.docx' ( this step is needed to automate document generation, we can't update a '.dotx' from back-end.) Now the document looks as in below screen.


With above step, we are ready with document library and if we create a new document in this library, it will automatically fill in all the corresponding placeholders and our document is ready.

Step 5: Now, create a document to test it. If you click on 'New Document' in the document library, a word document with previously created template opens. Also, a form with all the new fields we created will be displayed on top.


Step 6: If we fill-in the corresponding details,  the place holders will be automatically updated and once you save it, a new document with these details is created in the document library. A sample document will appear as in below screen after filling all details.


To, create this document dynamically, we need to create new item through back end in the library, by filling all the properties we created. This can be achieved in multiple ways. 

I created a list with same details and using a workflow on the list, when a new list item created,  it will create a new item in the document library by filling all corresponding properties in library.

To do this, follow below steps. 

Step 7: Create a Sharepoint list with the same columns we created for library.


Step 8: Open Sharepoint designer and Go to the list we created and click on New workflow. Fill in the Workflow Name, description

Step 9: Select action 'Create List Item' from Actions tab in ribbon

Step 10: Click on 'this list' and choose the document library we created.

Step 11: Using 'Add' option, choose each column and fill it with the current item corresponding column data. Also, modify default field 'Path and Name' with the convention you prefer.

Step 12: Once all the fields are mapped. Save the workflow. And, select the option to 'Start workflow automatically when item created' and publish it. I also added another step to send email with the newly created document link.

With these steps we completed our configuration / development process for the functionality.

To test it, create a new item in the list with  all the details. Then, open our document library to see the newly created document with the details.

This feature not only automates document creation, but also helps us in logging the details in online system which will be helpful for future references / audit purposes.

Wednesday, December 31, 2014

Accessing / Controlling Form fields in Visualforce pages using Jquery

It's a most common requirement that we need to access Form fields using JavaScript in any web technologies, for different reasons. In Salesforce too we can access / control using JavaScript. Lets understand how to accomplish this using below example.

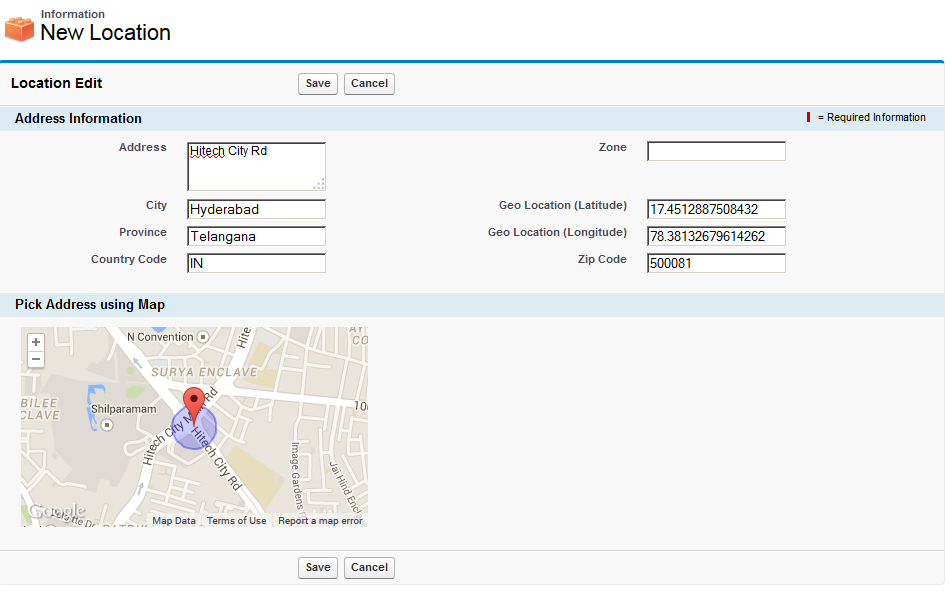
Problem Statement: We have an object named Locations in Salesforce in which we store location details, that includes Address, City, Province / State , Country, Geo Co-ordinates etc. So, in a new or edit screen of a record, we want to provide a map where user can pick the location and it should automatically fill all the available details into the fields and on top of it, user can modify if any changes needed, then Save the record.

Solution: One among the easiest ways to provide a solution for above problem is having a map in the Form screen using JQuery Maps API and upon location changed in the map, updating the details of location ( fetched using API ) into the existing fields using JavaScript by accessing  through DOM.

To do this, we need to create a Visualforce page as we can't directly add custom code into default form screens in Salesforce. You can follow below steps to accomplish it

  1. Login to Salesforce
  2. Under Logged in User name drop down, select 'Setup'
  3. In left navigation, under 'App Setup' section go to 'Develop' and then 'Pages'
  4. List of all Visaulforce Pages are displayed. Now click on New button
  5. Fill in all the basic details of the new Page
  6. In the Visualforce Markup section, add below code and save it.
 <apex:page id="LocationPage" standardcontroller="Location__c" tabstyle="Location__c">  
      <apex:form id="FormLocation" >  
           <apex:sectionheader title="Information" subtitle="{!if(Location__c.Id==null,'New Location',Location__c.Name)}"></apex:sectionheader>  
           <apex:pageblock mode="edit" id="locationPB" title="Location Edit">  
                <apex:pageblockbuttons >  
                     <apex:commandbutton action="{!save}" value="Save"></apex:commandbutton>  
                     <apex:commandbutton action="{!cancel}" value="Cancel"></apex:commandbutton>  
                </apex:pageblockbuttons>  
                <apex:pagemessages ></apex:pagemessages> <!-- displays all message generated by the component -->  
                <apex:pageblocksection id="AddressInformationPBS" title="Address Information">  
                     <apex:inputfield value="{!Location__c.Address__c}" id="Address" ></apex:inputfield>  
                     <apex:inputfield value="{!Location__c.Zone__c}" ></apex:inputfield>  
                     <apex:inputfield value="{!Location__c.City__c}" id="City" ></apex:inputfield>  
                     <apex:inputfield value="{!Location__c.Geo_Location__Latitude__s}" id="Latitude" ></apex:inputfield>  
                     <apex:inputfield value="{!Location__c.Province__c}" id="Province" ></apex:inputfield>  
                     <apex:inputfield value="{!Location__c.Geo_Location__Longitude__s}" id="Longitude" ></apex:inputfield>  
                     <apex:inputfield value="{!Location__c.Country_Code__c}" id="Country" ></apex:inputfield>  
                     <apex:inputfield value="{!Location__c.Zip_Code__c}" id="Zip" ></apex:inputfield>  
                </apex:pageblocksection>  
                <apex:pageblocksection id="AddressPickerPBS" title="Pick Address using Map">  
                     <div id='map' style='width:100%;height:200px;'></div>  
                     <script src="https://code.jquery.com/jquery-1.10.2.min.js"></script>  
                     <script type="text/javascript" src='https://maps.google.com/maps/api/js?sensor=false&libraries=places'></script>  
                     <script src="https://rawgit.com/Logicify/jquery-locationpicker-plugin/master/locationpicker.jquery.js"></script>  
                     <script>  
                          $('#map').locationpicker({  
                               location: {    
                                    latitude: {!if(Location__c.Geo_Location__Latitude__s==null,17.4512887508432,Location__c.Geo_Location__Latitude__s)},  
                                    longitude: {!if(Location__c.Geo_Location__Longitude__s==null,78.38132679614262,Location__c.Geo_Location__Longitude__s)}  
                                    },  
                               radius: 100,  
                               onchanged: function (currentLocation, radius, isMarkerDropped) {  
                                    var addressComponents = $(this).locationpicker('map').location.addressComponents;  
                                    $('#LocationPage\\:FormLocation\\:locationPB\\:AddressInformationPBS\\:Address').val(addressComponents.addressLine1);  
                                    $('#LocationPage\\:FormLocation\\:locationPB\\:AddressInformationPBS\\:City').val(addressComponents.city);  
                                    $('#LocationPage\\:FormLocation\\:locationPB\\:AddressInformationPBS\\:Province').val(addressComponents.stateOrProvince);  
                                    $('#LocationPage\\:FormLocation\\:locationPB\\:AddressInformationPBS\\:Zip').val(addressComponents.postalCode);  
                                    $('#LocationPage\\:FormLocation\\:locationPB\\:AddressInformationPBS\\:Country').val(addressComponents.country);  
                                    $('#LocationPage\\:FormLocation\\:locationPB\\:AddressInformationPBS\\:Latitude').val($(this).locationpicker('map').location.latitude);  
                                    $('#LocationPage\\:FormLocation\\:locationPB\\:AddressInformationPBS\\:Longitude').val($(this).locationpicker('map').location.longitude);  
                               }  
                          });  
                     </script>  
                </apex:pageblocksection>  
           </apex:pageblock>  
      </apex:form>  
 </apex:page>  

Most of the code is Visualforce Markup. All tags used in it are basic default ones used for building a form. Most of the tags are self explanatory by their names.  Lets understand some important tags we used in above code along with the Javascript.

As mentioned in problem statement, we are creating Visualforce page for a custom object 'Location__c' as mentioned in 'StandardController' attribute of 'Page' tag.

 <apex:pageblockbuttons >  
      <apex:commandbutton action="{!save}" value="Save"></apex:commandbutton>  
      <apex:commandbutton action="{!cancel}" value="Cancel"></apex:commandbutton>  
 </apex:pageblockbuttons>  

Command buttons are the action buttons displayed for a page on top and bottom of the form. We added the default 'Save' and 'Cancel' actions provided for any object by Salesforce.

 <apex:pageblocksection id="AddressInformationPBS" title="Address Information">  
      <apex:inputfield value="{!Location__c.Address__c}" id="Address" ></apex:inputfield>  
      <apex:inputfield value="{!Location__c.Zone__c}" ></apex:inputfield>  
      ......
 </apex:pageblocksection>  

From above code we can understand that we are using 8 custom fields in the 'Location' Custom object to store the detailed address information of the location.
 
'InputField' tag automatically displays the corresponding control of the field , along with data if it is used in edit screen.

 <script>  
      $('#map').locationpicker({  
           location: {    
                latitude: {!if(Location__c.Geo_Location__Latitude__s==null,17.4512887508432,Location__c.Geo_Location__Latitude__s)},  
                longitude: {!if(Location__c.Geo_Location__Longitude__s==null,78.38132679614262,Location__c.Geo_Location__Longitude__s)}  
                },  
           radius: 100,  
           onchanged: function (currentLocation, radius, isMarkerDropped) {  
                var addressComponents = $(this).locationpicker('map').location.addressComponents;  
                $('#LocationPage\\:FormLocation\\:locationPB\\:AddressInformationPBS\\:Address').val(addressComponents.addressLine1);  
                $('#LocationPage\\:FormLocation\\:locationPB\\:AddressInformationPBS\\:City').val(addressComponents.city);  
                ...
           }  
      });  
 </script>  

Above script is the default configuration of the 'Jquery Locationpicker' plugin. You can understnad more about this plugin  at this link, Jquery Locationpicker

Most important code to understand in above block is accessing fields.

$('#LocationPage\\:FormLocation\\:locationPB\\:AddressInformationPBS\\:Address').val('...');

In Salesforce, for a HTML Control, DOM Id is generated dynamically. A control ID has all the parent sections' IDs hierarchically with colon ( : ) separated. 

So, in our above example, HTML rendered ID of a control ( Client side ID ) is

"Page ID:Form ID:PageBlock ID:PageBlockSection ID:Control ID"

If you are adding any extra section or removing some section, ensure these blocks are updated.

Now, you can set this page as default New / Edit form by overriding the existing buttons in the 'Location' Object. This can be accomplished using below steps,

  1. Login to Salesforce
  2. Under Logged in User name drop down, select 'Setup'
  3. In left navigation, under 'App Setup' section go to 'Create' and then 'Objects'
  4. All the custom objects are listed. Click on 'Location' object
  5.  Go to 'Buttons, Links and Actions' section and Edit the existing buttons 'New' and "Edit'
  6. Now Choose 'Visualforce Page' radio option and select the newly created page from the drop down and save it.
Now when you click on New or Edit record of Locations, screen will be displayed as below.
Try changing the point displayed in map. It automatically updated above fields. Now user can change is any information to be updated and then save it accordingly.

Tuesday, December 30, 2014

Chrome Extension, explained with Simple example

After using many Chrome extensions and Apps, I thought of writing an extension on my own. But couldn't try it as I felt it might be difficult and need to learn many other concepts / languages related to it. Recently I tried and realized that my assumptions on it were wrong. Its too simple and we don't need to learn any new concepts to implement it except few configuration options.

So, to start with a basic extension, lets go with below example,

For a Chrome extension, manifest file is mandatory. It provides information about the extension. It acts as a configuration file for our extension. Its in JSON format. There are lots of options / fields available, to understand each check out at Google site  . In our sample we used 5  fields as in below code.
 {  
  "name": "SampleExtension",  
  "manifest_version":2,  
  "version": "0.1.1",  
  "description": "Sample extension, changes title and main image in a wiki article",  
  "content_scripts": [  
   {  
    // list websites in whcih you want to execute this extension
    "matches": ["http://en.wikipedia.org/wiki/*"], 
    //CSS and javascript resources we use 
    "css": ["styles.css"],  
    "js": [ "jquery.min.js","contentscript.js"]  
   }  
  ]  
 }  

Lets understand each field we used in above code


  • Name: this is the name of the extension and it comes in Extensions list once installed
  • Manifest-Version: this is the manifest file format version. and it should be 2 as 1 is deprecated
  • Version: version of our extension
  • Description: Description about the extension
  • Content_scripts: This provides core functionality information of the extension
    • matches: List all the websites in which our extension should execute
    • css: CSS files if we are using any
    • js: JS resource files if we are using in our extension
Copy the above code and paste in a new file and save it into a seperate folder with name 'manfiest.json'. Note the format is 'JSON'.

As we see in above code, we specified 3 resources, of which 1 is CSS and other 2 are javacript files
We need to create those files and save them in the same folder we have 'manifest.json'

In my sample, CSS file code is as below,
 #firstHeading span  
 {  
      color:red;  
 }  

And, code for 'contentscript.js' is,
 $(document).ready(function(){  
 $('#firstHeading span').html('My Custom Name using Extension');  
 $('.infobox.vcard img').first().attr('src','http://cdns2.freepik.com/free-photo/boy-face-cartoon-clip-art_430749.jpg');  
 });  

Don't forget to add the other Jquery file which you find on google.

Now our extension is ready. To, test it in you local machine,

  1. Go to Extensions of Chrome which is available in settings 
  2. Check 'Developer Mode' select box available on top.
  3. Once you check, 'Load Unpackaged Extension..' button will be displayed.
  4. Click on it and provide the folder which has above 4 files
  5.  Now the extension is loaded and enabled as in below image
  6. TO test it open wiki page of any person or any article. you will see the title changed and also the article main image(if available) is changed


Friday, December 26, 2014

Display maps in Salesforce Record View screen

Problem Statement:  
  We have a Custom Object to maintain 'Shipment details', which has 'To Address' and 'From Address' details along with other information in Salesforce.We need to display these details on a Map along with other information in the Detailed screen.

Approach we Used:
 Its very easy to display it on maps. We followed below steps to implement it.
  1.  Create a Visualforce Page  to display map using Google Maps API with Javascript.
    1. To create new Visual page, click on setup, then in left navigation pane, go to Build > Develop > Pages
    2. List of all Visual pages are displayed. Click on New and provide required fields
    3. Now, paste below code in the Markup Block
        
         
       <apex:page standardController="<<Custom Object API Name>>">  
       <apex:pageBlock >  
       <script src="https://maps.googleapis.com/maps/api/js?v=3.exp"></script>  
       <script>  
            var directionsDisplay;  
            var directionsService = new google.maps.DirectionsService();  
            var map;  
            function initialize() {  
             directionsDisplay = new google.maps.DirectionsRenderer();  
             var chicago = new google.maps.LatLng(41.850033, -87.6500523);  
             var mapOptions = {  
                 zoom:7,  
                 center: chicago  
             };  
             map = new google.maps.Map(document.getElementById('map'), mapOptions);  
             directionsDisplay.setMap(map);  
             var request = {  
                  origin:new google.maps.LatLng({!<<Custom Object API Name>>.From_Geo_Location__Latitude__s}, {!<<Custom Object API Name>>.From_Geo_Location__Longitude__s}),  
                  destination:new google.maps.LatLng({!<<Custom Object API Name>>.To_Geo_Location__Latitude__s}, {!<<Custom Object API Name>>.To_Geo_Location__Longitude__s}),  
                  travelMode: google.maps.TravelMode.DRIVING  
             };  
             directionsService.route(request, function(response, status) {  
                 if (status == google.maps.DirectionsStatus.OK) {  
                  directionsDisplay.setDirections(response);  
                 }  
             });  
            }  
            google.maps.event.addDomListener(window, 'load', initialize);       
       </script>  
       <div style='height:230px;width:100%'>  
         <div class='map' id="map"></div>  
       </div>  
       </apex:pageBlock>  
       </apex:page>  
      
    4. For Origin and Destination values in above code we provided the latitude and longitude coordinates of the data stored in the record
    5. Save the page.
  2.  This page will be listed in the layout screen of the custom object for which we are creating
  3. Add this page into any section of layout where we want to display.
  4. To add this, Click on Setup, in left navigation pane, go to Create > Objects
  5. All the custom objects are displayed, select the Object on which we are working and go to 'Page Layouts' section and click Edit 
  6. Add a new section and drop the listed page into it and Save.
  7. Now click on any record of the custom object to see the map we added with directions between the 2 locations of the same reord


Friday, December 12, 2014

Conditional Formatting in Sharepoint 2010


Problem Statement:  
  In a task list, we need to change background color of critical column based on its value and also the status (another field value)

Approach we Used: 
We have Conditional Formatting option in the designer using which we can set styles and also display the content based on conditions

Explanation with Example:
Step1: Open site in the designer and open one view.aspx file of a list that you need formatting

Step 2: In the View tab of designer, we have Task Panes, in that select conditional Formatting.


Step 3: Now select one cell content in the column on which we need formatting.
                Eg: On top, in critical section I selected yes word.

Step 4: Then Conditional Formatting section is highlighted, and then click on Create dropdown button which is in Conditional Formatting section


Step 5: You can see 3 options available, Show content, Hide Content, Apply Formatting, choose any one.
                Eg: I have chosen Apply Formatting


Step 6: Then we get conditional Criteria window, in which we set condition.
                Here you can group conditions, and as you can see, select field name in the list and we can compare to some value for equal or other etc. We even have advanced to have complex conditions

Step 7: Now after you complete preparing condition, click on set style which means, this style which we put is applied on the column items which we selected in the starting if the given condition is satisfied

Step 8: Now style window is opened in which we can set our style we need. Finally click on Ok, to finish our work.

We can see the condition created in the Conditional Formatting section which you can select it and modify further.

Similarly we can hide or show content based on conditions.


Done.

Wish it helps you