Saturday, July 4, 2020

Send Adaptive Cards to Teams through Microsoft Flows

There is lots of progress happening in Providing functionalities / actions to Connect Microsoft Teams  through Power Automate. In this article, we will go through sending Adaptive Cards through Flows. 

Before we proceed, a quick gist about Adaptive Cards is, these are JSON formatted object content, rendered as UI in the Native Apps, like Teams, Outlook etc. For more details, can refer to https://adaptivecards.io/ . We Also have Card Designer IDE to drag and drop the controls and configure the properties. Once we design the UI, we can copy the JSON object and use in Flows to send it.

Flows have 4 different actions to send Adaptive Cards

These are, either to send to a user / teams channel and to send a card or wait for the response too.

All these 4 actions have sections for recipients, could be the user or the team and channel. Then, the Message section where we provide the JSON object. In wait for response card, we would have 2 more fields, one is the flag to say weather to send update card upon response  and the other one is with the Update message. As of now, Update message accepts plain text only. 

It would be cool, if they enable JSON object for update message too. 


A sample JSON, configured for demonstration is 
 {  
   "type": "AdaptiveCard",  
   "body": [  
     {  
       "type": "TextBlock",  
       "size": "Medium",  
       "weight": "Bolder",  
       "text": "Ticket Details"  
     },  
     {  
       "type": "ColumnSet",  
       "columns": [  
         {  
           "type": "Column",  
           "items": [  
             {  
               "type": "Image",  
               "style": "Person",  
               "url": "https://lh3.googleusercontent.com/ogw/ADGmqu9GlzolarU9-XLK_gQi4fzgEuJp1pFa8kqHN0Xa=s192-c-mo",  
               "size": "Small"  
             }  
           ],  
           "width": "auto"  
         },  
         {  
           "type": "Column",  
           "items": [  
             {  
               "type": "TextBlock",  
               "weight": "Bolder",  
               "text": "LaxmiNarayana Ruttala",  
               "wrap": true  
             },  
             {  
               "type": "TextBlock",  
               "spacing": "None",  
               "text": "Created July, 4th 2020",  
               "isSubtle": true,  
               "wrap": true  
             }  
           ],  
           "width": "stretch"  
         }  
       ]  
     },  
     {  
       "type": "TextBlock",  
       "text": "Add an adaptive card to send feedback form to assigned users. Upon receving the response, update the sharepoint list and send notification email to our admin department. ",  
       "wrap": true  
     },  
     {  
       "type": "FactSet",  
       "facts": [  
         {  
           "title": "Department:",  
           "value": "Finance"  
         },  
         {  
           "title": "Expected By:",  
           "value": "July 15th 2020"  
         }  
       ]  
     }  
   ],  
   "actions": [  
     {  
       "type": "Action.OpenUrl",  
       "title": "View Ticket",  
       "url": "http://www.luckytechshare.blogspot.com"  
     }  
   ],  
   "$schema": "http://adaptivecards.io/schemas/adaptive-card.json",  
   "version": "1.2"  
 }  

We can refer any dynamic content in above data sample, could be from a sharepoint list content or other.

Once I configure it in the flow action and execute it,

it will be appearing on teams as below,
This is sent through the Flow Bot and also we would see the connector account details (used for this action in the flow) to the bottom of card, to avoid spamming.

If we want to capture any information through the card,we use Wait for a response action and configure input controls in the card. Upon submitting the info, the flow control receives the data in JSON object. It would have responder details and time stamp of it.

 {  
  "responseTime": "2020-07-04T11:38:14.4164791Z",  
  "responder": {  
   "objectId": "c3ede2bd-8341-4154-a3ae-4df6cf742e3a",  
   "tenantId": "a0ccad62-05f5-48bc-975b-c170b08d4ac9",  
   "email": "lucky@tmsdemo.onmicrosoft.com",  
   "userPrincipalName": "lucky@tmsdemo.onmicrosoft.com",  
   "displayName": "LaxmiNarayana Ruttala"  
  },  
  "submitActionId": "Assign To Me",  
  "data": {  
   "teamAadId": "8e92d18c-4f2f-4cdb-8980-70cf01ce6e76",  
    "inputField":"value"  
  }  
 }  

We can access this info in the flow and perform required actions.

We can also mention users in the adaptive cards. We simple need to add email id of user enclosed in 'at' tag.
              eg: <at>lucky@tmsdemo.onmicrosoft.com</at>

For some reason, this is not working in actions with wait for response. For those, we can add JSON object as below by referring the user ID and refer the 'at' tag notation at places needed.

 "msteams": {  
   "entities": [  
    {  
     "type": "mention",  
     "text": "<at>AssignedUser</at>",  
     "mentioned": {  
      "id": "8:orgid:c3ede2bd-8341-4154-a3ae-4df6cf742e3a",  
      "name": "Lucky"  
     }  
    }  
   ]  
 }  

Happy Coding :-)


Saturday, June 13, 2020

Integrate Microsoft Flows with Power Apps

In this article we would go through the steps of Creating a Flow and integrating it with a PowerApps Form.

Though Power Apps doesn't has ability to call any web services / rest apis, it provided easy way to integrate with Flows, thus if we have any complex logic to be executed in the form, we can call a Flow with configured input parameters and the Flow executes the logic and provides response output parameters. 

Creation of  PowerApps Supported Flow
  • Create a Flow of type "Instant - from Blank" and in the trigger, select Power Apps,
     
  • Now, for any input parameter that required from PowerApps, click on any action and from Add Dynamic content window, select Ask in PowerApps from Manual section.
     
    We refer to as many input parameters we want and all would be in string.
  •  Build your logic using input values 
  • Finally, to respond back with output values, use Respond to a PowerApp or Flow action. This action would provide an ability to add any number of Output values of different types. 

  • Save the flow.
Creation of PowerApp and integrating the above Flow
  • Create an App or through any Sharepoint List, click on customize forms. I used Sharepoint list here
  • Select the Screen Control and go to On Visible property, in the function pane, click on Action tab and choose Power Automate. A subscreen pops up with list of available Flows. Click on the Flow we want to call.
     
  • Once we click on it, it adds a Method to call the Flow and it highlights shows the input parameters to fill in.
     
  • Here i set the output of Flow response to a variable and referred it in couple of label texts

  • Save the PowerApp and publish it. Once we load the form, we can see the responses on screen

Few important observations are as below
  1. Boolean output is not coming up in the PowerApp. Better we use string type and compare it
  2. For date field, PowerApps is considering as a string.
  3. On a high note, though we have different data types for output, if we want to sue in powerApps, better we use string type and convert them

Thursday, June 4, 2020

Microsoft Flow - Setup Sharepoint Groups and Users

In this article we would go through Creation of a Sharepoint Group, providing access to it and then adding a set of users to it through the Microsoft Flow using Sharepoint Rest APIs.

Creation of a Group:
Rest API to create a group is 

Uri: /_api/Web/SiteGroups
Method: POST
Header: {content-type:'application/json; odata=verbose'}
Body:{
               "__metadata": {
                        "type": "SP.Group"
               },
               "Title": "Demo Group - Contribute",
               "Description": "Created through API in Flows."
           }

We refer the above API call in Flow action: Send an HTTP Request to Sharepoint as in  below


Set Permissions to Sharepoint Group:
Rest API to set Permissions for a group / user is 

Uri: /_api/web/roleassignments/addroleassignment(principalid=<<PrincipalID>>, roledefid=<<PermisisonRoleID>>)
Method: POST

Here, PrincipalID is the ID of group created in above action. we can fetch this in Flow as body('HTTP_-_Create_Group')?['d']?['Id']
And, RoleDefID is the ID of permission role we are looking to assign. In sharepoint, each permisison role has an internal ID. We can find them by accessing Rest API /_api/web/roledefinitions
Here, for Contribute, the RoleID is 1073741827


Add Users to a Sharepoint Group
Rest API to add users to a Sharepoint group is

Uri:/_api/web/sitegroups/GetById(<<GroupID>>)/users
Method: POST
Header: {content-type:'application/json; odata=verbose'}
Body: {
                  "__metadata": {
                          "type": "SP.User"
                  },
                  "LoginName": "<<LoginName of User>>"
            }

We already have GroupID from the first action and for user, we need Login Name of it. 


Once we execute it, it creates a group and adds user as in below


If we have multiple user accounts, we can add them to an array and use loop action for this API. Or, use BULK API to merge all calls except the first one as we need GroupID for other service calls. For Bulk API, I have provided demo in my previous post Set Permissions on a Sharepoint list Item

Wednesday, June 3, 2020

Microsoft Flows: Move Library documents

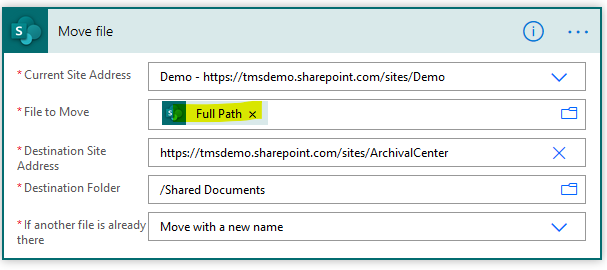
This article is to go through about Get Files (Properties Only), Move File and Move Folder Sharepoint actions in Microsoft Flows through below implementation.

We want to archive all the files / folders in one library to Central Archive (Separate Site Collection).

Source Library: A Document library with versioning enabled and also has some Meta data columns.

Destination Library: 
  • In Destination Library, we need to make sure the versioning is enabled (as we have it in Source) with higher or same limits as in Source Library. 
  • It should also include all the meta data columns as in Source Library as Move Actions would fail if schema doesn't match from Source
  • Few extra columns like Archived on and SourceLoc to capture archival info.

Below are the steps to achieve the functionality
  1. Use Get Files (Properties Only) action to fetch all the files and Folders in the given source library
    Note: We need to make Include Nested Items Property to "No" as we don't want the documents inside folders and when we move folders, it would go along with inside content.

  2. Apply to Each action to lop through each File / Folder fetched from above action
  3. Condition action to check if the current file is a File or Folder. We have IsFolder property to identify it.
  4. Based on above condition, 
    • If its folder, use Move Folder action to move complete folder along with content inside it to destination library
    • If Its File, use Move File action to move the corresponding file to destination.

      Note: Both above actions work same as the Move to commands we use in sharepoint
  5. Once the Move action is completed, in order to update the Archival meta data in destination, use Update File Properties  action.

    Here as we either moved File / Folder in above action, we use below if logic to fetch the correct ItemID to update.  
    If(empty(body('Move_file'))
            ,body('Move_folder')?['ItemId']
            ,body('Move_file')?['ItemId']
      )

Complete flow would appear as below,


When we run this flow, it moves all files from Main Library in Demo Site to Documents Library in ArchivalCenter.

Friday, May 22, 2020

Microsoft Flows - Send Email with List Item Attachments


In Flows, we don't have direct option to provide attachments references in Email actions. We need to get the content bytes and provide it either in JSON array format or individual file name and content values.


So, in order to send attachments in email,  we first need to get the content to a variable and then use it in the Send an Email action.

Flows has separate Sharepoint inbuilt actions to fetch list item attachments and also documents from a library. 

Below are the steps to send list items attachments in email

Initialize a Variable of type array to hold all the attachments.


Use Get Attachments action to fetch list of attachments in a given list item. This provides attachment name, unique file identifier. 


Use Apply to Each action to go through each attachment fetched from above action.
 
Fetch Attachment content using Get Attachment Content action by providing the unique file identifier

Then, using Append to array Variable action, add the attachment content in expected format. Here, while providing content bytes, we need to make sure to add ['$content'] to the reference as the byte content is in this parameter. body('Get_attachment_content')?['$content']

Note: If the attachment file is .txt, the "Get Attachment Content" action would return content into body, there is no JSON response here. In this case, we can simply use body('Get_attachment_content')

For "ContentBytes" property of attachments array, we can have a generic function as below
if( endsWith(items('Apply_to_each')?['DisplayName'],'.txt'), body('Get_attachment_content'), body('Get_attachment_content')['$content'])


Now, refer the attachments array variable in the Attachments section of Send an Email action.


In the same way, if we want to send any documents from library, we can use available action 

Also, if we want to send the attachments through Approval action, instead of "ContentBytes", we need to use "Content" in the Attachments JSON array.

Happy coding :-)


Thursday, May 21, 2020

Microsoft Flows - Send an Email - SPUtility

Before we go into how to implement it, we shall quickly look into the advantages and disadvantages of using this approach to send emails In Flows for Sharepoint.

Advantages:
  • Using this approach we can avoid the complex configuration to send  Email to Sharepoint Group 
  • we can set any Sharepoint user in From Address, i.e. the Email can be addressed from any existing Sharepoint User. This will be helpful to send emails on behalf of Managers etc.
  • Can send HTML formatted email content. This helps us to design custom templates
Disadvantages:
  • Cannot attach files in the email
  • Can't send emails to external emails or mail boxes, i.e. the emails that doesn't have user accounts
  • From Address cannot be configured to any Mailbox or random name
Implementation:

we use SPUtility SendEMail Rest API method to send an email using HTTP Request to Sharepoint Action

As the SPUtility send email is a sharepoint related method, it only accepts Sharepoint entities to send emails and also if we provide a Sharepoint Group name, it would resolve it internally and sends emails to group members.

Below is sample screenshot and the JSON input we used to send email.

This email goes to Sharepoint Group "Demo Sharepoint Group", CCing Sharepoint group "CC Sharepoint Group" along with user "John". And this email is sent on behalf of "Riyana"
Also, we provided an external email id in TO list, but it doesn't send. 


Body:
 {  
       'properties': {  
         '__metadata': {  
           'type': 'SP.Utilities.EmailProperties'  
         },  
         'From': 'riyana@tmsdemo.onmicrosoft.com',  
         'To': {  
           'results': ['Demo Sharepoint Group','nonuseremail@external.com']  
         },  
         'CC': {  
           'results': ['CC Sharepoint Group','john@tmsdemo.onmicrosoft.com']  
         },  
         'Body': '<p>Demo EMail, <br/><br/>Sample email through Flows.</p>',  
         'Subject': 'Sample email through SPUtility'  
       }  
     }  

And the email in Outlook is