Thursday, March 31, 2016

SQl Server: Group Adjacent Rows if Certain Column Value is Same.

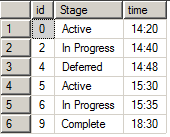
Below image to the left is original data as in Status change Tracker table. And, what we are expecting is the one to the right. i.e. we want to group the adjacent rows if they are in same stage and need the time stamp when the Stage added for the first time.


To achieve this, below is the simple query needed.
select t.*
from #StatusLog t
left join #StatusLog t1 on t.id = t1.id + 1 and t1.Stage = t.Stage 
where t1.id is null

If we don't have a Column as ID with sequential numbers, use Row_Number () to get the sequential number for rows and execute above script by replacing Id column with it.

Also, if multiple columns should be equal, we can add them along with stage condition in above script.

Sunday, March 27, 2016

Access Sharepoint Lists in SSRS Reports (SQL Server 2012)

There are many cases where we need to display SharePoint List records in SSRS reports. To achieve this, earlier we used to follow different hard paths like trying to access SharePoint Database, using some 3rd party tools to integrate SharePoint lists, etc.


But, in SQL Server 2012 reporting / Report Builder 3.0, this was made straight forward be adding an option 'Microsoft SharePoint List' in Data source type selection. follow below simple steps to get some basic idea on creating a Dataset for a SharePoint List.


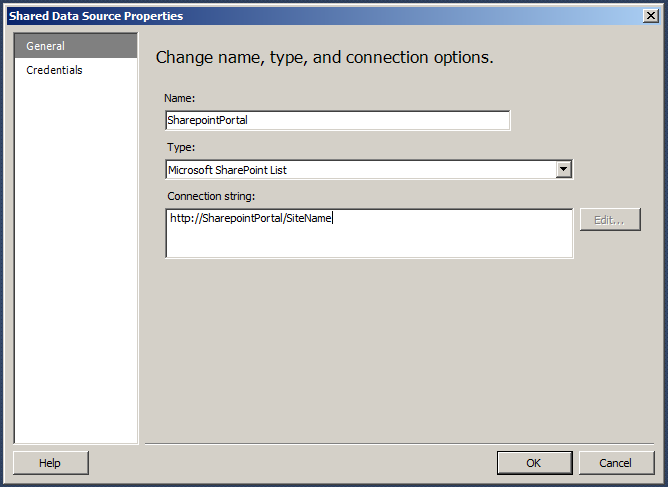
1. Click on Create New Data Source and select 'Microsoft SharePoint List' from Type Selection Dropdown

2. Now, prove the SharePoint Portal URL in Connection String. Also, provide the Credentials as per your need and Click on Ok.


3. Now we have a dataset pointing to the SharePoint Portal. We are left with creating a Dataset. Click on Create Dataset and select SharePoint Portal as Data source.
4. Now, click on Query Designer and you will be able to see the SharePoint Lists / Libraries available in provided SharePoint portal.
5. Select the List you needed and also the required fields from it. In section 3 in above image, you can filter the SharePoint List data. Once set up, click on OK.


Now we have a dataset which fetches data from SharePoint list and you can build any type of report using this data set.


Below are few important notes to be considered in this aspect.
  • Default view data is fetched  from the SharePoint list when we connect it as a Data Source
  • If we need to join multiple lists, easy way is to create a list in SharePoint using Lookup relations and then directly creating a dataset for the new list.


Monday, December 7, 2015

Set few Fields read only in Quick Edit of a Sharepoint (2013) List view.


You can set few fields as read-only in a Quick edit / Datasheet mode of a List view through Sharepoint designer. Follow below steps to achieve it.

  1. Create a List view with all the required fields (Including Read only and editable fields) and by applying required filters 
  1. Now, open the List in sharepoint designer and edit the Newly created list view file in 'Advanced Mode'. You can do it be right clicking on the View Name in the List
  1. In the file, go to  'XMLdefinition' tag, inside that you can see 'ViewFields' section where all the fields added in step 1 are available.
  1. For all the read only fields, you add ReadOnly="TRUE" attribute in the corresponding FieldRef tag.
  1. So, a Field ref tag for a read only field would be as
      <FieldRef Name="Product" ReadOnly="TRUE"/> 
  2. Now save the file and open it in browser.
  3. Once you go to Quick Edit, you can see the read only columns are disabled.

I tested this in Sharepoint 2013 and all other functionalities like filters / sorting on read only fields work as is.

Thursday, August 13, 2015

Read & Update Display Names of List Columns through Javascript in Sharepoint

We can Read Columns (Internal Name, Display Name / Title, Type etc) & also Update Columns (Display Name / Title) of a List in Sharepoint ( 2010 & above ) using Client Object Model.

Below is the sample code in javascript to read Columns for a List.
 function retrieveAllFieldsOfList(listName) {  
   var ctx = SP.ClientContext.get_current();  
      var web = ctx.get_web();  
      var list = web.get_lists().getByTitle(listName);  
      var fields = list.get_fields();  
      ctx.load(fields, 'Include(Title,InternalName)');  
      ctx.executeQueryAsync(Function.createDelegate(this, this.Success), Function.createDelegate(this, this.Failure));  
 }  
 function Success()  
 {            
      var _fields = '';  
      var lEnum = fields.getEnumerator();  
      while(lEnum.moveNext())  
      {  
           var internalName = lEnum.get_current().get_internalName();   
           var title = lEnum.get_current().get_title();  
           _fields = _fields + 'Internal Name:' +internalName+ ',Title:' +title+ ';';  
      }  
      console.log(_fields);  
 }  
 function Failure(sender, args)  
 {  
      console.log("Failed" + args.get_message());  
 }  

Below is the Sample Code in javascript to Update Title / Display Name of a Field in a Sharepoint List
 function updateMonths(listName){  
      var ctx = SP.ClientContext.get_current();  
      var web = ctx.get_web();  
      var list = web.get_lists().getByTitle(listName);  
      //Below field section to be repeated for multiple field updates  
      var field = list.get_fields().getByInternalNameOrTitle('<Internal Name / Existing Title>');  
      field.set_title('<New Title>');  
      field.update();  
      ctx.executeQueryAsync(Function.createDelegate(this, this.Success), Function.createDelegate(this, this.Failure));  
 }  
 function Success()  
 {            
      console.log('Updated Successfully.');  
 }  
 function Failure(sender, args)  
 {  
      console.log("Failed" + args.get_message());  
 }  

Tuesday, August 11, 2015

Set Current User as default value in People Picker Sharepoint

We can't directly set default values for People picker fields in Sharepoint. We can achieve it using SPServices.

Below is the sample code to set logged in user name as default value for a People picker field

 <script src="../../Style Library/scripts/jquery.min.js" type="text/javascript"></script>  
 <script src="../../Style Library/scripts/jquery.SPServices-0.7.2.min.js" type="text/javascript"></script>  
 <script type="text/javascript">  
   $( document ).ready(function() {  
        //To set logged in user name as default value in a people picker field with display name, "Requested by"  
           //People Picker Field Display Name  
           var fieldName = 'Requested By';  
           //Check if the field is empty. As, this script gets executed each time the page loads(Could be during validations)  
           if(($().SPFindPeoplePicker({peoplePickerDisplayName: fieldName}).currentValue).trim() == '')  
           {  
                //Get current Logged in User  
                var currentUser = $().SPServices.SPGetCurrentUser({  
                                         fieldName: "Name",  
                                         debug: false  
                                    });  
                //Set logged in user name to the people picker   
                $().SPFindPeoplePicker({  
                      peoplePickerDisplayName: fieldName,  
                     valueToSet: currentUser,  
                     checkNames: true  
                });  
           }  
   });  
 </script>  

Access this link to know more about the SPServices method 'SPFindPeoplePicker' used to set people picker

Don't forget to check if the field value is empty before you set, as the end user might have changed the name and when the user clicks on Submit, if there are any validation errors, page reloads and the script gets executed.

Tuesday, June 30, 2015

Salesforce Custom Labels

In Visualforce Pages / custom Components, we might need to display static content. Also, in many places we will be displaying custom messages on screen, could be alerts / notes / error messages. In all these cases we can directly write the content in corresponding place holders. But the disadvantage of it is, to update the text we need to open the corresponding Visualforce or controller pages and edit them. Also, it doesn't support in multilingual applications i.e. doesn't have translations and if a person from different location logs in, this text language will not be changed.

To overcome these problems, and also maintain all messages at one place, Salesforce has provided 'Custom Labels'.

You can define a custom label for any message and can directly access it through apex code in controller or Visualforce page. We can also translate this to the languages supported by Salesforce.

To access custom labels, Go To Setup —> Create —> Custom Labels. All existing custom labels are displayed. Click on New Custom Labels.

A form will be opened. Provide all the required information and save it.

 Now you can see the newly created custom label. Also, in the bottom of screen, Translations section is available. Here we can provide the label's translation of all other languages this salesforce application / organization supports
 Click on 'New' button available in Translations section. Another form is opened, provide the translation and also select the language.


Now the label is available for usage and also it supports multi languages. 
You can access it throughapex and also visualforce page.

To access through Visualforce page, use global variable '$Label'
              In above example, it would be '{!$Label.Test_Item}'

To access through apex in controller, use 'System.Label'
              In above example, it would be 'System.Label.Test_Item'

Based on logged in user's language , the label text is displayed in corresponding translation.


Friday, June 26, 2015

Link Data in PowerPoint to the Source (Database / Sharepoint)

It’s very common to have PowerPoint Presentations for High level Meetings.  We even have lots of data represented in these presentations in the form of Charts / Tables.  And, this would be a recurring process to update the presentations with updated data. This takes lots of manual efforts.

We can automate process of updating the presentations with latest data to a fair extent with available out of the box features. It requires minimal development efforts. 

On a high level, we first create Excel sheet with all the required data being fetched from different sources like Databases / Sharepoint using Data Connections. This would provide auto updating of data to Excels. Also, using the data we create different views, could be charts / Pivot tables or any other as per our representation need. After our excel sheet with different charts / tables is ready, we insert these into our Presentation by maintaining the links to the Excel we created. Linking would provide auto updating of data from excel to our Objects on PowerPoint, which is actually connected to main data source (database / Sharepoint list). 

With these efforts, we are done and now our Presentation is ready and also the data in it is up to date.  Isn’t it simple to implement and saves lots of our efforts, we spend in regular intervals to update the data on it?

Now let’s try to implement the same with a simple example to understand it better. 
Here our goal is to display Sharepoint data in our Monthly Dashboards which are actually PowerPoint Presentations.

Step 1: Prepare your data connections ready to bind to actual real time data (Sharepoint List here)
  • Open Sharepoint List which has our required data.
  • Create a view with required fields and also if there are any filters to be applied, you can do that here.
  • Now open the view we just created and in the ribbon, under ‘List’ tab, we have a button to ‘Export to Excel’.
  • Click on it. A web Query file (.iqy) is downloaded. Please save into your local machine. Let’s rename this file to ‘DashboardData.iqy’

Step 2: Create excel sheet with required representations (Charts / tables) using above created Connections
  • Open excel file and in ribbon, under data tab, Click on ‘Connections button’
  • A window with available connections to the workbook is opened. Click on ‘Add..>
  • Another child window opens with all available connection files in our local machine.
  • Click on ‘Browse for More’ button, a file browser window opens, now select the ‘DashboardData.iqy’ file we downloaded in step 1.
  • You can see the newly added connection listed in Workbook Connections window
  • With this connection you can create pivot table or Pivot charts. For example, under ‘Insert’ tab in Excel, click on ‘PivotChart’ available in ‘Tables’ section. A window to select data source is opened. Now select the above created connection.
  • Now a pivot table with data from Sharepoint list is available with all fields we added in the List view of Sharepoint
  • Create chart with required fields and save the Excel file
  • In similar way we can create multiple charts as per our need. We can also bind data to the sheet and using Conditional Formatting, we can represent cell values as per requirement.
  • After all the required charts / tables created , save the file

Step 3: Insert the tables / charts we created in excel to the PowerPoint presentations with links
  • Open existing PowerPoint presentation / new one and add all the required sections / content into it.
  • In the sections where we need to add the dynamic content i.e. charts / tables, we bring it form excel file.
  • As an example, copy the Pivot chart we created in excel and go to the powerpoint presentation we are working on
  • In ribbon, under ‘Home’ tab, we have ‘Paste Special’ button in ‘Clipboard’ section. Click on it
  • A window with option to paste as object and link feature is opened
  • Select ‘Paste link’ and click on Ok.
  • Now move the chart object to the required section and also adjust the size etc.
  • Similarly repeat the same step for all required objects
  • Save the Presentation File.
With these efforts, our presentation is ready with data linked to Actual data sources.


If you need the presentation with updated data, simply open the excel we created in step 2 and refresh all the data connections in it. All objects in the presentation will be automatically updated with latest data.

To refresh the connections, open excel file and under ‘data’ tab, we have ‘Refresh all’ button. Click on it. We can also automate this using some macros.

Now it’s your turn to automate the Presentations you update regularly!! 

Thursday, June 11, 2015

Sharepoint, Hide List or library in Site Content Pages

While developing applications on Sharepoint, there might be a requirement to create some lists for Internal use and they have to be hidden from end users in Web front end i.e. in View All Site content screens etc.

To achieve this functionality, we need Sharepoint designer. Before implementing it, we need to hide the list from left navigation. To do this, go to 'List settings' and  'Title description and navigation' and select 'No' for 'Display this list on the Quick Launch?', then click Save.  

  • Now open the site in Sharepoint Designer 
  • In left navigation click on 'Lists and Libraries'
  • All lists in the existing site are displayed along with Document libraries
  • Now click on the Library / List which you want to hide
  • A screen with the corresponding List settings is opened
  • In Settings section , available to left , Under 'General Settings' category, an option 'Hide from Browser' is available. 
  • Select it and save the page.

With above changes the list is hidden in All site content Page and other site pages.
By doing this, we are just not listing it along with other Lists, still you can access the list if you have its corresponding web link.

You also need to note that due to this change, it will also be hidden in Designer under 'Lists and Libraries' navigation block.
To access it in designer / to list it back, follow below steps.
  • Open Site in Designer
  • Click on 'All Files' in left navigation.
  • Now click on 'Lists'
  • Here you can see the hidden Lists too.
  • If its library, it will be listed when we click on 'All files'
  •  Now right click on the hidden list and go to 'Properties'
  • Now the screen with List details and Settings is opened, same as earlier
  • Here uncheck the option 'Hide from Browser' and save
  • Now it would be available in All content and also in designer

Wednesday, May 13, 2015

Sharepoint Workflow running on Old Version after publishing

Observed a weird behavior in Sharepoint Designer workflows. We have Workflows designed on designer and being used in our application. There are multiple versions on it as we added new features time to time. Recently we added some more features and published to latest version. It updated to server and could see latest version in Workflows section of the corresponding List in website.

But, when we run the workflow, we observed that its of too old version, many latest features were missing.

After doing some online research, we realized that the problem is due to cache of workflow activities in the local machine where we implemented them using Designer.

Sometimes, SPD might be using the old DLL fro mthe cache than the updated one and thus we see old version running. To correct this issue, we need to clear the Cache and run the Designer and republish the workflow. And also, its better to disable option to cache site data in designer, to avoid similar problems in future. To do this, follow below steps.

  • If Sharepoint Designer is open, close it
  • Open My Computer and enter '%USERPROFILE%\AppData\Local\Microsoft\WebsiteCache' in address bar
  • Delete files and other folders in this location
  • Now go to this location '%APPDATA%\Microsoft\Web Server Extensions\Cache' and delete all fiels and folders
This would solve the issue and now if you re publish the workflow, it would work fine.

To disable Site Data caching, follow below steps

  • Navigate to the "File" menu then select "Options" -> "General" -> "Application Options"
  • On the “General” tab, under the “General” heading, uncheck “Cache site data across SharePoint Designer sessions” 

Thursday, March 19, 2015

Configure Redirect URLs after Record Saved in Salesforce

In general, after a record is saved in Salesforce, it will redirect to Detail Screen or list of records of its corresponding Object.

There are many cases where we want to override this functionality. For example, after a new Account created, we want user to create Tasks to it, so once the New Account is saved, page should redirect to New Task screen with Current Account ID details.

To accomplish this, we in general need to create a Custom New Form for Account and in that form, we override default save action and once default save action is accomplished, we redirect using PageReference

We also save one more easy way to accomplish this on default forms, adding details through URL parameters.

By default, Salesforce provided 3 URL parameters,  'retURL', 'saveURL', 'cancelURL'.

We can make use of these parameters to redirect the screen after default button actions.

lets understand with below simple example.

https://demo.salesforce.com/a08/e?retURL=%2Fa08%2Fo&saveURL=/apex/google&cancelURL=/apex/yahoo

The above URL is actually a new form for a custom object.

https://demo.salesforce.com/a08/e

But we also provided other parameters along with URL.

saveURL=/apex/google, this parameter is used for redirection after the record saved. So, once a record is saved, it redirected to a custom page 'google', also the newly created record Id is sent as a parameter by default.

https://demo.salesforce.com/apex/google?newid=a08o0000006rTSR

cancelURL=/apex/yahoo, this parameter is used for redirection if user clicked on default Cancel button . This redirects to a custom page 'yahoo' if user cancelled the form.